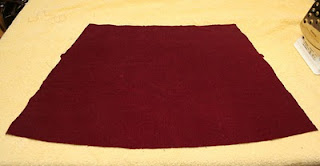
I've said before that I like to alter patterns I already have to get a style I want. This particular alteration is super simple to pull off. Today we're adding two box pleats to the front of a basic A-line skirt.
This skirt is my 1st grader's. She loves to wear it with wild patterned tights. When I made it, I accidentally cut out two (you know how you are supposed to fold the fabric in half most of the time when you lay out a pattern? yeah. Not this one.) oh well. My loss. Your gain. I'm going to sew my extra skirt up for one person who comments on this post. One entry for commenting. One extra entry for linking to my blog in your blog. Let my know in the comments that you've linked. I'll let my little girl draw a name out of a hat. My teenage daughter likes hats. We have several around here these days.
This skirt is a size 4-5 with a finished length of 12 1/4". I can sew the waist to whatever measurement you wish.
You need to start with a basic A-line skirt pattern. It's best if the front of the skirt is flat rather than gathered or with an elastic waist. The back can have the elastic waist though. This technique works with any sized skirt, for little girls or grown women. First decide how deep you want the box pleat to be. For a little girl, like this skirt, a 1" pleat is fine. I did a box pleat skirt very similar to this for myself with a 3" pleat.
So, how deep is the pleat? Quadruple that measurement and add that amount to the skirt front. For this skirt I wanted 1" pleats, so I added 4 inches. 1x4=4.
If the front piece is laid on the fold you'll push the pattern piece back from the fold half the added amount. If you are adding 4" to the skirt front you want the pattern edge 2" from the fold. Be sure to measure both at the top of the pattern piece and the bottom.
If your pattern has a full piece for the skirt front, you'll need to split the pattern down the center. Evenly spread the pattern pieces apart the amount you want added to the skirt front. In this case the pieces had a 4" gap between them. Do be sure you keep the pattern piece lined up with the grain line in the fabric for both front pieces.
Now cut out the skirt front.
The box pleats should be centered over each leg, so you need to mark the fabric piece. Measure in 5/8" from each edge and mark that with a pin. Now fold the fabric in half and mark the center with a pin. Do this at the top and bottom edge of the skirt. Bring one side over toward the center, lining up the side pin with the center pin at the top and bottom. Press flat. Mark that fold with a pin at the top. Measure down 4 5/8" from the top edge and mark that with a pin. Do the same thing to the other side.
Sew from the waist to the pin the width of your box pleat. I wanted a 1" pleat, so my seam here is 1" from the folded edge. If you were sewing a 3" box pleat on an adult sized skirt you would sew 3" from the folded edge. By the way, you can sew it down farther. 4" is about 1/3 of the finished length and that's about right for a sewn pleat. If you were sewing a skirt that was 18" long you might want to sew the pleat 6 5/8" down. The 5/8" is to account for the seam allowance at the waist. (Yes, if you win this skirt there will not be any white thread. I plan to pull that out and redo it in the right color. The white was just to make the seam easy to see.)
Press the pleat flat with the folded edge centered over the seam.
Now you have a finished front with pleats. Continue sewing the skirt using the directions that came with your pattern.
Have fun and be sure to comment if you want a skirt like this one for your daughter/niece/granddaughter/alien child/next year's Halloween jack o' lantern. Leave an email or sign into a Google account so I can contact you if you win. Thanks!


Did I win?
ReplyDelete