Everybody has that one drawer in the kitchen. You know the one I'm talking about. It's a mess and useless because of the mess. I had two. A couple of years ago I tamed the other drawer with some plastic drawer organizers and decided what belonged in that drawer and what didn't. It was such a success that my other drawer has really frustrated me. Sometimes I even had difficulty opening it around all the stuff we didn't know what to do with.
At the same time, my family developed a charging problem. We went from a two device home to a six (or seven) device home. Which meant, since there were children involved, that charger cord stealing had become a serious, and yet frequent, crime. My husband and I could only ever keep one cord between us, a serious issue with three devices to charge.
So how do you fix both issues at once? Like this:

I love it. It's functional. It holds exactly what I need it to. And I always have a charger for my phone (and everyone else's besides.) Isn't it pretty? It was also very easy to build. It only took a saw, a drill, some sandpaper, less than 6' of 1x3, and some planning.
The planning is very important. You need to decide exactly what needs to be stored in the drawer and how big those storage places need to be. I knew I needed a section for phone charging, a section for bills and coupons, and a section for important papers (like the ones from school that I need to sign but always get lost.) The rest of the space I knew would fill up with whatever fit and needed a home. I planned a six inch wide section the full depth of the drawer for the charging station, a slightly larger than 8.5"x11 for the papers, and an 11x whatever was left for the bills. If you have a family tablet, or larger phones, you will want a larger section for the charging station. Six inches is a bit tight even for what we have.
Next, you need to measure your drawer. Get this measurement exactly. I mean down to the 1/32 of an inch. The better this measurement, the tighter your divider will fit. Mine is so tight it doesn't slip at all. This way we didn't have to nail or glue it in so it's easily removable if we ever need to change things.
Now you need to plan your cuts. I have two pieces the full length of the drawer and two the width of the two divided sections, so two 19.5", one aprox. 6" and one aprox. 8.5". This allowed me to keep the pieces down to only four, so it was easy to put together and will be stronger. In order to figure out my lengths, I made a sketch:

Everything is perfectly to scale in that because I used an architectural triangle ruler. I learned how to use one in high school. It's so easy that even though I haven't used one in ages, I still knew what I was doing. It's a pretty handy device. If you would like to learn to use one, this video explains it well. Because I drew my plan to scale, it made it very easy to figure out how long each piece of wood should be. Then I double checked my measurements with math. Once I had cut the wood, I also did a dry fit in the drawer. Getting things cut perfectly even when you have the right lengths is very difficult. A dry fit allows you to recut or sand until you get things right.
Because I was using a clear polyurethane finish on the divider, I wanted it to have invisible fasteners. Using doweling meant that I was able to fasten the boards together without anything showing. To make things as easy as possible, I bought a doweling kit from Home Depot. (You may have to ask to find these. They aren't in the fastener aisle or near the full length dowels at my Home Depot. They were inexplicably back by the doors.) The kit comes with exactly the right size drill bit, a drill bit collar, and two marking pegs, along with about ten ridged dowels. It's pretty easy to use. The collar sets your bit depth and the pegs are used to mark where to make the dowel holes on the second piece of wood without having to measure.

I then cut a piece of no-slip drawer liner to fit the charging station. I had some of this around already, so it was free for me. You can pick up drawer liner for pretty inexpensively in any kitchen department.
The charger is an Anker brand charging port. I liked that it could charge six devices at once, didn't overcharge, and I could charge both Apple and other brands from the same charger. I bought six micro USB 1 ft charging cables to go with it. They're white so they match, of course. I did some research before I bought these to be sure they were sturdy and would do the job I needed. The Anker charging station came with a piece of double stick tape so it was easy to attach to the side of the drawer.

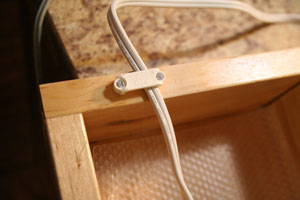
The cord is secured with a wire fastener. The drawer back was low enough that the wire goes over the back with plenty of clearance.

We chose this particular drawer in our kitchen because there is an outlet in the side right here. My husband was able to put a second outlet right next to it facing into the cabinet so the charger could always stay plugged in. It's also already on a GFCI circuit so it gives us a bit more peace of mind. That's easy to do if you have electricity close by and have electrical experience. Otherwise, hire a professional for that part.
All I had to after that, was start using the drawer.

I love it! It's been so great to have and I know it will be a lot easier to keep organized.

Nice project. Couple tips for other people thinking about something similar. You can replace an AC Outlet in your house with an AC outlet that has USB charging ports on it. Here are some examples from Home Depot http://tinyurl.com/ovw8yw9
ReplyDeleteAnother source for high quality charging cables for your devices is Monoprice.com