Thursday, September 29, 2011

My Handkerchiefs

Isn't it lovely?  Ok, so its' not the best photograph.  I need to work on that.  Semi translucent handwork is not the easiest thing to take photographs of.  I think I do a better job with two year olds.  At least I have more practice at it.  

This is my favorite of the three.  It's English silk and was a gift to my great great grandmother (I got the greats wrong on a previous post) from her sister.  Aunt Louisa lived in England and did not emigrate when my great great grandmother did.  Louisa still kept in touch with her sister and came out to visit on more than one occasion bringing lovely handkerchiefs with her as a gift.  
 Here's a slightly better look at the detail.  This particular handkerchief is all machine made, but I really think it's still lovely and I love the story of the sisters who didn't let thousands of miles separate them.  Imagine how difficult it was for Louisa to come out west with trains barely coming through and having to cross the ocean in a steamer ship?  It must have taken weeks.
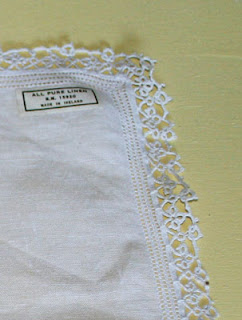
 This is my grandmother's tatting work.  She liked to purchase premade hankies and put lace edging on them. They were designed for this with tiny little squares all around the edge of the hankie so the lace maker could work the lace directly onto the handkerchief.
 As you can see this particular hankie is Irish linen.   Get a gander at that tatting.   Can you imagine tying that many knots?  My grandmother loved to tat and she did beautiful work.
 This hankie was purchased with the flower machine embroidered already on it.  Grandma used colored thread for the lace for the contrast.  It worked well didn't it?  It's a striking hankie.   This one is a polyester blend.
 As you can see the lace here is crochet and mixes white thread and red together to form the design.  My mom said that when she was a girl they would often make a special trip into the next town to a sewing store there.  That particular store carried a good variety of colored crochet thread and my grandma loved to work in color.
My mom had so many of these.  It was so hard to choose just three.   I can't wait to get them framed and hanging on my wall.  They'll all be framed on a colored mounting cloth.  I'm thinking velvet or velveteen.  The frames will give me fits because I need at least 14" square frames.  We'll see what I can get figured out.  I do know that if I make my own I can have glass cut for them quite cheaply at the glass stores in the next town over.    They will be framed with their stories attached.  The story is what makes them more than just a pretty piece of fabric.

Monday, September 26, 2011

Remembering

Many years ago when my grandmother passed away my mother and her sisters went through her things and divided up much of it.  Sadly, as they went through her cedar chest, much of what they found had no meaning to them.  There was no story or memory they could attach to the items.  They had beautiful lace, dresses, embroidery that was without meaning to them.  They knew it was special to their mother and that's all they knew. 

So today I spent time with my mother cataloging her cedar chest.  She emptied the chest onto her bed.  I took a picture of every item.  Mom told me about them, who made it, where it came from, where it was used.  For the particularly special items, I brought my video camera to record Mom telling about it.  I think my favorite video is the one with my Great Grandmother's hair combs and pins.  She is going to take the photos and type up everything she knows about the items.  The document will be printed out and put in the cedar chest.

I came home with three vintage handkerchiefs.  Two have hand worked lace edging, one crochet, the other tatted.  The third handkerchief is well over 100 years old, silk, from England.  I know that my grandmother did the lace edging and that my great grandmother's sister would bring handkerchiefs with her as a gift when she came from England for visits.  The silk handkerchief is one of those gifts.  These are my "payment" for helping.  I'll be archivally framing them and hanging them as wall decor in my new living room.   They will be beautiful and will make me happy every time I look at them.

I'm also happy to know that when the time comes for my sisters and I to go through my mother's cedar chest without her we will know the stories.  

I guess I'm just telling this story because I think everyone should document what they have.  We won't always be around to tell someone else about why that stack of envelopes is special or who crocheted the lace on that pillowcase.  There are a lot of things in our lives that are priceless to us and worth little without the story to go with them.  Make sure the people you love have the stories.  

Friday, September 23, 2011

Chocolate Chip Cookies For the Cheapskates

I adore cookies.  I love making them.  I love eating the dough.  I love the reaction my family has to a freshly baked batch of cookies.  I love eating a cookie straight out of the oven.  Cookies are Love.  (And my thighs and backside show how much love I have in my life.)

Here's the recipe, with a story to follow about the ingredients and how I cut costs without cutting flavor.


Cheapskate Chocolate Chip Cookies

1/2 cup margarine
2/3 c vegetable shortening (butter flavor is nice too if you have it)
1/2 c white sugar
1 1/2 c brown sugar
2 t vanilla
2 eggs
1 t baking soda
1 t salt
3 cups flour
1 1/2 c chocolate chips
1/2 to 3/4 c nuts (optional)

Cream the margarine, shortening, and sugars.  Mix in the vanilla and eggs until well blended.  Stir in the baking soda, salt, and flour.  Stir in the chocolate chips and nuts.  Drop 2 T size balls onto ungreased baking sheets and bake in a 350 degree oven for approximately 12 minutes.   Remove from oven when edges are golden brown and the very center looks just a little doughy.  Let rest on cookie sheets for five minutes, then put on cooking racks.  Try not to burn yourself eating them hot from the oven.


The story:
  My favorite cookie recipe over the last few years has been the chocolate chip cookie recipe from ATK.  It painfully calls for half a pound of butter and four eggs.  That's on top of the package of chocolate chips, nuts, and the other ingredients that all recipes call for.  That makes a batch of cookies cost around $7 these days.  As much or more than I budget for dinners.  Sadly, with the recent price hikes at the grocery store and the lack of paycheck hikes going on our household, I had to rethink our food budget and pricey cookie recipes just don't work for us anymore.

Something had to change.  My first step was to go back to my old favorite from years ago that called for margarine.  I can hear you screaming from here.  Yes, I know that butter is healthier and it's nicer and it makes babies happy and brings you kittens, rainbows and happy thoughts.  Butter is nice.  Butter is also $3 a pound for the store brand.  $4 a pound if you want something with actual flavor.   Margarine is 1/3 to 1/4 the price.  Since cookies aren't that healthy for you anyway, I don't sweat the margarine.

I also use Crisco.  Purists and foodies can leave now.  The rest of you stick around.

My second step was to stop buying chocolate chips at the grocery store.  I have my mom pick me up a huge bag of semi-sweet chips at Costco.  This is the industrial size bag in a brand I've never heard of before, Ambrosia.  They are good chips, no Ghiradelli's but we're trying to save money here.  When I get these chips I have to measure them out for each batch of cookies.  If I leave them all in the big bag, they get eaten (by my husband.  Not so much by me.  I'm a milk chocolate girl.)   Instead of doing 2 cup portions, a full 12 oz. size, I do 1 1/2 cup size portions.   It gets me several extra portions of chips out of the package. I promise, I don't miss that extra half cup of chocolate chips. Last time I had 17 sandwich bags of chips from one big bag. It worked out to be less than $1.50 per baggie.  That's about $3 less than brand name chips per batch. I throw the sandwich bags back in the resealable original bag and put it in the freezer for long term storage.  It's probably not the way you'd treat premium chocolate, but it's great for chocolate chips.

I also use imitation vanilla for cookies.  There's almost no difference in flavor in baked items between imitation and the real deal.  If you consume cinnamon you aren't allowed to pull the "imitation vanilla is made from tree bark" argument.  Food comes from all parts of plants.  I'm ok with that.

The ATK cookies are still part of my cookie line up, but they are reserved for special occasions and guests.  For the occasional after school snack, Cheapskate cookies are just fine.  I figure my less expensive cookies cost approximately $4 less to make than the ATK version.  They still taste like Love even without the butter.

Thursday, September 22, 2011

Small Camera Bag Hack

I have an SLR camera with a very large bag that holds most of my equipment.  It's a backpack style, which is nice to carry because I can bend over and lean while wearing it without worrying that the bag is going to swing around and whack somebody.  As long as I wear both straps I don't whack people, I mean.  Don't ask me what happens when wearing just one strap.  It's not pretty.

The problem is that it's a very big bag that is very heavy.  This summer was very busy with lots of trips.  The full size bag would be way more equipment than I needed and I knew I couldn't hike 26 miles in it.  I needed a camera bag that would carry just the camera and one lens.  Ideally, I would have had a Crumpler sling bag, but since I didn't want to spend $50, I was out of luck.  

So I made my own.
I started with a $3.99 mini backpack purse from Salvation Army.  It had the right size main compartment and a little zipper pocket on the front for an extra battery, flash cards, and ID.  The heavy duty nylon canvas would put up with the abuse of a hand cart trek, a trip to the beach, and all around travel.  It's not the prettiest, but hey, you can find a prettier one for yours.

The grey block in the picture is the secret to this project:  high density foam.  Regular foam probably isn't going to do it.  You need the the super good stuff.  This is the product they use to protect lots of delicate equipment and my husband just happened to have a little bit in storage.
I sat the bag on the foam and traced around the base with a pen.  This was a little bigger than the foam needed to be, so I cut it just a bit smaller and rounded off the corners.  I made two of these.   Then I traced around the lens that I wanted to use in the bag.  This time I cut the foam out a little larger than what I traced.   In one block, I cut the circle all the way through.  In the second block I cut it only halfway down.  That was a pain, and it's not pretty, but it works.

I made sure the two foam blocks lined up at the lens hole.  Then I shoved them into the bag.  The camera fits in the bag lens down.  Like this:
On the sides, I cut spare blocks to fit around the body of the camera.  It would be best if one were to glue the foam together into the proper shape.  I'm lazy and have no clue what kind of glue to use, so my foam is still in pieces.  Nevertheless, this bag has been perfect.  I took this with me on my 26 mile hand cart trek.  My camera came through with nary a scratch or bump even after a torrential downpour and ridiculous amounts of dust.   It went to the beach with no problems as well.  Not that I went around dropping the bag in the surf, but it did well in the salty, humid air.  

If I were to upgrade this, I would probably try to find a leather bag.  Then I'd actually glue the foam and hopefully cover the whole foam block section in a nice printed fabric for contrast and fun.  Otherwise it's been great.  Today, my camera goes with me to a cross country meet.  I love taking the lighter bag.  My back thanks me too.

Wednesday, September 21, 2011

Living Room Redo: The chairs

Yeah, this is the third time I've posted that photo.  I just love my chairs.  I found them at Salvation Army for $20 for the pair.  They were an ugly, dark walnut stain that was worn and dingy.  I'm kicking myself for not getting before pictures.  The transformation is so wonderful.

The chairs were hand made by a Mr. Juan Carlos Garcia in Antigua, Guatemala.  He left that information carved into the front apron of the chair.  My favorite part of the chairs is all the gorgeous hand carving.  Don't you just love that flower and scrolling?  In the dark stain, the carving just got lost.  The color really brings attention to the details on the chairs.


This is the harp shaped back support.  More lovely flower and scroll work.   You can see a bit of the caned seat in that photo too.  The caning was hand woven and isn't an applied piece of fabric.

I don't often find fabulous buys at thrift stores, but this time I think I really scored big.  I love my chairs and I love that they are bright and happy.  Next step is either the floor rug or the paint.

Tuesday, September 20, 2011

Living Room Redo: The backstory

So, the whole living room thing.  There's a story to that.  We moved into our house nearly 10 years ago.  We had three children at the time and I was pregnant with number four.  We figured we'd spend five years remodeling and sell for a profit.  The problem was we spent eight years (and we still weren't finished) when the market tanked.  So we're kind of stuck, just like 90% of America right now.  

One of the things I disliked about my house from the very beginning was that there was no separate eating area.  No eat in kitchen.  No dining room.  If I wanted to eat at a table with my family the table had to go in the same room as the couch.  So for nearly ten years, my dining room and my living room have been one in the same.  One in the same 12x19 foot space.  Not even kidding.  The room is big enough to be an acceptable living room, but you add in a full size upright piano and a table and chairs to seat seven, and things get very tight, very quickly.   I've put up with it,  though, because I didn't have a good solution to my problem.

We also have another room in the addition.  It's kind of a weird space and small.  We've used it as an office and later as a play room.  My kids are all getting older though.  I only have two who still play with toys, so a designated play room just didn't make sense anymore.  

Two weeks ago we took down the playroom and made it the living room.  The redo is slow going.  I'm hoping to have it done by Christmas.  I'm very excited.  I am already enjoying the front room with just the table and piano.  I was able to put in a bigger table so we didn't have to squeeze around a six person table anymore.  It looks great in there.  

Now I just have to get the living room done.  I'm planning red and turquoise.  All I have in there so far is my big red couch and two turquoise chairs but I already love it. 


Monday, September 19, 2011

It was a very long summer

First, I spent a week pretending to be a pioneer.  This meant weeks sewing pioneer clothing for myself and my daughter and gathering up a bunch of camping equipment in a household then tends to not go camping.   It was worth it though, one of the most amazing, spiritual experiences of my life.  Totally worth the 26 miles pulling/pushing a handcart with 10 (amazing) teenagers.  I'd do it again in a heart beat.

Next my brother got married.  This meant bridesmaid dress for my oldest daughter and a flower girl dress for my youngest.  My husband had to rent a tux to be best man.  I made the cake and I took the photos.
Isn't he handsome? Best looking guy there.  You will not see pictures of the cake.  It was serviceable, but not brag worthy.

After that my husband's brother got married, so we drove down to Southern California.  Did I mention we live in Idaho?  17 hours by car through the most boring section of the United States.   I did grab that photo on top on the way down though.  It was in one of those little, dying towns that litter the Nevada desert along the highway.  Our air conditioning died about an hour outside of San Diego on the way down.  That was fun.  The wedding was lovely though and we had a good time at the beach.

Then a bunch of other stuff happened and I finally got to send my children back to school.  I gave myself a couple of weeks of rest.   We have now moved on to a complete rehaul of most of the house.  Right now I'm concentrating on my living room.  These chairs go in it:
Yes, that's a red couch in the background.  There will be lots of pictures along the way, but this won't be a fast redecorating project.  I have to do it as funds become available.  I think painting the walls a light turquoise is the next step.  I still am hunting down a rug I like and fabric to coordinate.  However, the photo at the top of this post will be done in a 16x20 canvas for the wall.  I'm excited about the project.  It's all I've been able to talk about for two weeks.