With all this social isolation going on, I decided it was a good time to get my teens helping with dinner. I've assigned everyone in the house one night of cooking per week. They are learning how to cook and I get a bit of a break from deciding what to make and a lot of help with preparation work. This week my youngest decided she wanted soup in bread bowls. She even made the bread dough all on her own without me.
The bread bowls can be any bread recipe you've got. I don't recommend an enriched dough because it needs to have a good crust. Your favorite loaf recipe is fine as long as it doesn't have eggs or a lot of fat. It doesn't need to be a rustic bread to have enough crust. We used this recipe because the youngest had used it before and felt comfortable with it. It made 6 perfect bowls. We used 9 oz of dough shaped into balls. We let the balls rise for half an hour and then baked them at 350 degrees for about a half-hour or so. Be sure to let them cool for 20 minutes before you cut the tops off so you don't get gummy middles. Once you cut the tops off (about an inch down) pull out the bread inside. Don't get overzealous here. You want to leave a little layer along the bottom and sides to help protect against leaks. It should come out pretty easily. The bread you pull out can be served with the soup for dunking or you can save it and turn it into croutons.
The soup is simple and only takes 20 minutes.
Cream of Chicken With Thyme
3 T olive oil
1 small onion, diced fine
1/2 t salt
1 t garlic
3 T flour
6 cups chicken stock
3 potatoes, diced
two sprigs of thyme (1 T leaves, fresh)
2 cups shredded chicken*
1/4 c plain yogurt (buttermilk works too)
3/4 c heavy cream
1. Heat the oil in the bottom of a 4 qt pot and saute the onion and salt until the onion is translucent and soft. Add the garlic and saute for 30 seconds.
2. Add the flour and stir cooking for a few minutes to make a roux.
3. Stir in the chicken stock and dump in the potatoes. Drop in the thyme.
4. Let simmer for 15-20 minutes until the potatoes are tender.
5. Add the chicken. Stir in the yogurt and heavy cream. Salt and pepper to taste.
6. Serve.
I know the garlic seems like too little, but it's designed to not be a major flavor, just a background note. You can also add celery with the onions if you like.
*Alternatively, in step 1 heat the oil and then add two chicken breasts to the pot. Brown lightly on each side, approximately 2 minutes. Remove and set aside. In step 3, when adding the stock to the pot, add the stock slowly and scrape the bottom of the pot to remove the fond and get it into the soup. Then add the chicken back into the soup. Poach in the stock until done. Remove from soup and let cool for a few minutes. Shred or cube according to preference and add back to the soup. Continue as written for the rest.
Saturday, April 25, 2020
Thursday, December 6, 2018
Pattern Review: Love Notions North Star
I got to be a pattern tester for another Love Notions pattern. This time I tested their very first men's pattern, the North Star.
I tested both the hooded and collared version of the jacket. The hood was a little big on my husband but it fits most pattern testers' models well. If you're worried you can sew a drawstring channel into the hood. The pattern recommends top stitching anyway. Just top stitch 1/2" back and add a small buttonhole or grommet on each side at the bottom of the hood. Then feed through a yard of twill tape and tie knots in the ends.
Yup, it's the men's version of the half-zip pullover. If you bought the Navigator and the Constellation, you can sew a matching set for the whole family now. They coordinate very nicely and have very similar style lines from version to version.
I sewed my husband the XXL. It gives him layering room without the fit being too sloppy. Check the finished measurements against the recommended size. You may want more or less ease than the pattern recommends. For example, I was using a sweater fleece that had a little more stretch than the pattern recommends and I like a little less ease. I sewed his first one in the XXXL and he was drowning in it. I had to take in the sides by quite a lot to get the fit right. The second one I sized down and it was perfect.
I tested both the hooded and collared version of the jacket. The hood was a little big on my husband but it fits most pattern testers' models well. If you're worried you can sew a drawstring channel into the hood. The pattern recommends top stitching anyway. Just top stitch 1/2" back and add a small buttonhole or grommet on each side at the bottom of the hood. Then feed through a yard of twill tape and tie knots in the ends.
The directions are careful and cover all the basics. There's even a video for the zipper installation if you're worried about that.
I will say that they are a little over generous with the fabric recommendations. I got both versions out of less than 2 yards of fabric each. The pattern recommends 2 1/2 yards for the hooded version and 2 1/4 for the collared. Just get 2 yards and you'll be fine. I know it's hard to buy fractions from online retailers, so not having to buy that extra full yard is a big savings. You will need more if you have to lengthen the pattern. My layout only gives you about 3" of wiggle room.
Getting it all under two yards just takes laying out the fabric correctly. Don't fold selvage ends together like you do for most patterns. Fold both selvage ends toward the center. Make sure you fold over the same amount on each side by measuring from the edge of the selvage to the fold. The amount should measure the same the full length of the fabric. You fold just enough to fit the pattern pieces, leaving a gap between the selvages. Measure your pattern pieces and then fold over that amount plus an inch or two. When doing the hooded version your center hood piece can be cut out of the fabric in the center between the other pattern pieces you've laid on the fold. It all looks like this:
That's the back piece, front top, pocket, and pocket lining all lined up on the left. On the right fold, I have both sleeves and the side hood. (By the way, if you like having all the pieces laid out completely before you start cutting, you can print an extra sleeve. You just need two copies of pages 22, 23, 27, 28, 34, and 35.) You only need to cut one of the center hood piece. You'll notice mine is up at the top in the middle. This isn't the only way to lay out the pattern; this method just worked well for me and fit the way the company designed the pieces.
Overall impressions:
Fit: loose and boxy. Made for layering. I found the sizing to be a little overgenerous in the upper sizes. It could have been my fabric, but I'll be watching it in the future.
Difficulty: Rated as "confident beginner" and it's pretty accurate. It sews up easily with the zipper and the bias trim being the only things that might make a beginner hesitate. There's a video for the zipper installation and no one will see if your topstitching on the bias isn't perfect. Promise.
Price: $10. Fair and in line with most online PDF patterns.
Will I make it again? Yup. I already have the fabric to make my son one as a Christmas present. He's looking forward to getting it.
Monday, November 19, 2018
Pocket hack for Vogue 7937

I love Vogue 7937. It's practically the perfect pencil skirt. Great lines, well designed, with several options so you can make more than one and still have variety in your wardrobe.
My first V7937 was View b, with the double kick pleat in back and the tab detail at the waist. I loved the fit and look of it. It was just missing one thing: pockets. So when it came time to make view D (and how could you not have view D in your wardrobe?) I knew I needed to hack some pockets. Since V7937 is a paneled skirt, it's easy to add an angled pocket. You can use this method to add a pocket to any paneled front skirt.
I was working with black fabric, so I hope you can see the pictures clearly.
You're going to make four new pattern pieces to create a banded edge, angled pocket like mine.
To start, lay pattern tracing fabric over the front side piece (piece 2 on this pattern.) Trace your size onto the pattern tracing fabric.
Now do some measuring. How far down do you want the pocket to start? How deep do you want the pocket? For me, I wanted the pocket to start about 5 inches from the waist and to be deep enough to hold my cell phone, about 6.5".
In order to figure out how far down you will start the pocket, subtract 1" from the distance you want the pocket from your waist. This takes into account the seam allowance at the waist and the top of the pocket, plus the width of the pocket band. Mark approximately in the center of the pattern piece.
To create the angle, I just held the measuring tape against the pattern until I liked the angle. The center of the angle is the mark I just made. You can make this angle as shallow or as deep as you like. draw the line on the pattern, but know you won't be cutting here. Use a dashed line if you wish to show it's not a cut line.
Next add the pocket depth+3/8" to the distance you measured down from the waist. Measure that from the waist and mark that in a straight line across the pattern. This is the bottom of your pocket. You'll cut this piece at that point and keep the top section. This is your pocket facing piece.
Next trace the original pattern piece again, making sure to trace the full length of the pattern. Transfer your pocket angle to the new piece. The easiest way to do this is to lay your new piece over the first piece and trace the line. Cut at this line, keeping the bottom of the skirt this time. This is your skirt piece.
Now lay the two pattern pieces you just created over the top of each other making sure to line up pattern markings (because you were careful to transfer the pattern markings, right?) Trace the shape of the overlapped sections. This is your pocket lining. Don't worry about seam allowances because they are already included.
You should now have three new pattern pieces: the skirt, the pocket facing, and the pocket lining. At this point, it's a good idea to line them all up and make sure all the pattern markings line up and your pocket is the depth you wanted it to be. If anything is off, now is the best time to correct it.
For the last pattern piece, cut a piece of pattern tracing fabric the width of your pocket angle by 2 1/4" wide. Make it a generous length. Mine was a couple of inches longer than it needed to be. This is good because I needed that to shape the piece to the pattern. This piece will make your pocket band 3/4" wide. If you would like yours wider or narrower, adjust your pattern piece accordingly.Keep in mind, the band is folded in half on the finished skirt so any adjustment you want to make should be multiplied by 2. For example, say you want a 1/2" band. This is 1/4" narrower than mine so you would need to make your band piece 1/2" narrower or 1 3/4" to accommodate the change.
1/4" x 2 = 1/2" 2 1/4" - 1/2" = 1 3/4"
Speaking of folding in half, now it's time to shape the ends of your pocket band piece. Fold it in half lengthwise and lay the folded edge toward the waist, lining up the seam lines on the pocket band and the edge of the pocket on the skirt piece. You can draw dotted lines for your seam lines if you wish, but this doesn't have to be too exact. Just try to get the angle on the band piece as close as you can to the pocket angle.
Trace the edge of the skirt onto the pocket band piece as shown in the picture.Now cut the band piece along those lines while it's still folded. You should have a piece that looks like this:
Cut the skirt out with your new pieces substituting in for the side front skirt piece included in the pattern. You need two of each piece.
To construct your new side front, fold the pocket band in half and press. Baste it to the top of the pocket right sides together with a 3/8" seam allowance. Make sure the pocket binding will line up correctly when pressed up by lining it up like this:
Notice how the corners hang off the skirt on each end? you want that. Line up the edge of the side front with the pocket band about 3/8" down from the cut edge. The folded edge should be facing the bottom of the skirt.
Now lay the pocket lining over the side front right sides together. Sew with a 3/8" seam allowance. Notice how the edge of the pocket lining lines up perfectly with the side front piece. If yours doesn't, you're probably using the wrong pocket lining piece or have sewn the band to the wrong side of the side front.
Fold the pocket lining to the back and press with the pocket band standing nicely up from the skirt. I also added a top stitch to help things lay smoothly.
Now lay the side front over the pocket facing and pin it together. Carefully flip the pieces over so you are looking at the back side of the pieces. Match the bottom of the pocket facing to the bottom of the pocket lining and sew together. You should be sewing right sides together.
You now have a fully constructed side front piece. The back will look like this:
And the front looks like this:Now construct your skirt following the pattern directions.
This is my finished product and I'm very happy with it. I love having pockets on my skirt and view D is as fabulous as it looks on the pattern envelope.
Good luck with your projects and feel free to ask questions if any part of the process isn't clear.
Tuesday, November 13, 2018
Pattern Review: Love Notions Constellation Pullover
I had the privilege this last month to be able to pattern test the new Constellation pullover from Love Notions Patterns. I don't sew for myself very often but I have been wanting to do more. When the call for testers went out, I jumped on the opportunity.
The Constellation is the women's version of the Navigator kids pattern. It hits all the same style lines, with a soft, somewhat boxy shape and a half zip with huge kangaroo pocket across the front. It's built to be layered so it's sized to be roomy, but not overly baggy.
I made two, but only did pictures of the second one. I chose a reversible athletic knit from JoAnn (I keep lusting over the fabric shops online but I never manage to pull the trigger. I like touching and playing with the fabric before I buy. Someday I'll actually do it just for the better quality fabric.) The knit I chose barely fits the 25% stretch recommendation but it worked just fine. The contrast color added some great style notes to the pattern. For this one, I did the curved hem with a bound edge. I also chose to add thumb holes in the cuffs. Sleeves are always long on me so I left the sleeve length alone and just added the slits in the seam on the cuff so I have the length I need in the sleeve without having to add length to the cuff. (There's a thumb hole cuff hack on the Love Notions blog. I used the technique but not the pattern piece. I don't like my sleeves twisting, so I also lined up the thumb hole with my actual thumb instead of the sleeve seam. About 1/4 of the way around the sleeve from the seam works pretty well.)
I made both the hooded and the collared versions of the pattern. The collar is a nice length for me and the hood is cozy and well fitted with a pieced shape. I saw several pattern testers color blocking the hood and using that center piece to add more interest to the jacket. There are quite a few ways to play with the look through color blocking or changing the details. I stayed pretty conservative with this one.Overall impression:
Fit: loose and boxy. The sizing is pretty accurate. and there is a full bust adjustment piece already designed if you need it. I made an XL but should have graded up at the hip. It's still comfortable and I've been wearing it a lot since finished it.
Difficulty: the company rates it at "confident beginner" and I'd say that's probably on target. If the zipper scares you, there's a great video tutorial link in the pattern instructions. For experienced sewers, it's a quick sew with mostly standard construction techniques.
Price: $10. Very much in line with other online, independent pattern companies.
Will I make it again: Yup. Already bought the pattern to sew one for a Christmas present. I'm also looking forward to the men's pattern that should be released before Christmas.
*Photo Credit: Murphy Brown. (My youngest kid. She's awesome.)
Sunday, January 10, 2016
A trench coat for my son
There are hundreds of patterns out there to sew for girls, and not that many to sew for boys. My younger son has sometimes felt left out when I sewed for his sisters and not for him, so when he started asking for a trench coat I decided that was something I could do for him.
Trench coats are quite hard to find in pre-teen and teen sizes. It's the sort of thing that is easy to find for men, but not so much for your boys. I suppose if I wanted to spend the funds I could have bought him a Ralph Lauren one. That seemed a little over the top even knowing how much he would wear it.
I was excited to find a pattern on Burda Style. It's BurdaStyle #147. The pattern was drafted well. It fits beautifully and looks quite sharp. I like the front and back flaps, the epaulets, the sleeve straps and the true welted pocket. The details work together to create a classic trench look.
That said, I'm not sure I would recommend this pattern to anyone. Yes, it looks good, but it was a monster to sew. I consider myself near expert level with my sewing. I have spent thousands of hours sewing and have sewn more than one formal gown. Hey, if you can sew a wedding dress, you've learned a few things, right? The instructions for this pattern left a lot to be desired. I don't need everything spelled out for me, but it seems I need more than this pattern is willing to give. The pocket instructions were especially confusing. I had to just put the pieces together and sort of backwards engineer my technique based on what I wanted it to look like when I was done. I'm happy with how it turned out, but frustrated with how little help the pattern was. I basically stopped bothering to read them after the pockets and just sort of went my own way after that, only stopping to check every once in awhile to be sure I was doing things in the right order. Even that screwed me up because it wanted me to sew on the front facing before I attached the collar. I should have known better than to trust the pattern and I ended up having to rip a few seams to get things laid out correctly. Don't even bother trying to use it to install the lining.
I used existing garments to decide on lining technique. I should have done it a little bit more than I did; there's a few things I should have done differently.
I used easy to find materials for this with a basic bottom weight cotton for the exterior and yarn dyed flannel for the lining to add extra warmth. The lining is purple plaid and he loves it since purple is currently his favorite color. The buttons are basic LaMode wood buttons. The buckles I ordered off Amazon. They are leather trench coat buckles in exactly the right sizes for the coat. I was excited to find them.
All in all, it was a good project that tested my skills. You really only learn when you stretch yourself, so it makes this trench coat an excellent learning tool. I've been wanting to be a better seamstress lately. I guess I should be careful what I wish for, huh?
Tuesday, October 13, 2015
Family Charging Station
Everybody has that one drawer in the kitchen. You know the one I'm talking about. It's a mess and useless because of the mess. I had two. A couple of years ago I tamed the other drawer with some plastic drawer organizers and decided what belonged in that drawer and what didn't. It was such a success that my other drawer has really frustrated me. Sometimes I even had difficulty opening it around all the stuff we didn't know what to do with.
At the same time, my family developed a charging problem. We went from a two device home to a six (or seven) device home. Which meant, since there were children involved, that charger cord stealing had become a serious, and yet frequent, crime. My husband and I could only ever keep one cord between us, a serious issue with three devices to charge.
So how do you fix both issues at once? Like this:
I love it. It's functional. It holds exactly what I need it to. And I always have a charger for my phone (and everyone else's besides.) Isn't it pretty? It was also very easy to build. It only took a saw, a drill, some sandpaper, less than 6' of 1x3, and some planning.
The planning is very important. You need to decide exactly what needs to be stored in the drawer and how big those storage places need to be. I knew I needed a section for phone charging, a section for bills and coupons, and a section for important papers (like the ones from school that I need to sign but always get lost.) The rest of the space I knew would fill up with whatever fit and needed a home. I planned a six inch wide section the full depth of the drawer for the charging station, a slightly larger than 8.5"x11 for the papers, and an 11x whatever was left for the bills. If you have a family tablet, or larger phones, you will want a larger section for the charging station. Six inches is a bit tight even for what we have.
Next, you need to measure your drawer. Get this measurement exactly. I mean down to the 1/32 of an inch. The better this measurement, the tighter your divider will fit. Mine is so tight it doesn't slip at all. This way we didn't have to nail or glue it in so it's easily removable if we ever need to change things.
Now you need to plan your cuts. I have two pieces the full length of the drawer and two the width of the two divided sections, so two 19.5", one aprox. 6" and one aprox. 8.5". This allowed me to keep the pieces down to only four, so it was easy to put together and will be stronger. In order to figure out my lengths, I made a sketch:
Everything is perfectly to scale in that because I used an architectural triangle ruler. I learned how to use one in high school. It's so easy that even though I haven't used one in ages, I still knew what I was doing. It's a pretty handy device. If you would like to learn to use one, this video explains it well. Because I drew my plan to scale, it made it very easy to figure out how long each piece of wood should be. Then I double checked my measurements with math. Once I had cut the wood, I also did a dry fit in the drawer. Getting things cut perfectly even when you have the right lengths is very difficult. A dry fit allows you to recut or sand until you get things right.
Because I was using a clear polyurethane finish on the divider, I wanted it to have invisible fasteners. Using doweling meant that I was able to fasten the boards together without anything showing. To make things as easy as possible, I bought a doweling kit from Home Depot. (You may have to ask to find these. They aren't in the fastener aisle or near the full length dowels at my Home Depot. They were inexplicably back by the doors.) The kit comes with exactly the right size drill bit, a drill bit collar, and two marking pegs, along with about ten ridged dowels. It's pretty easy to use. The collar sets your bit depth and the pegs are used to mark where to make the dowel holes on the second piece of wood without having to measure.
I then cut a piece of no-slip drawer liner to fit the charging station. I had some of this around already, so it was free for me. You can pick up drawer liner for pretty inexpensively in any kitchen department.
The charger is an Anker brand charging port. I liked that it could charge six devices at once, didn't overcharge, and I could charge both Apple and other brands from the same charger. I bought six micro USB 1 ft charging cables to go with it. They're white so they match, of course. I did some research before I bought these to be sure they were sturdy and would do the job I needed. The Anker charging station came with a piece of double stick tape so it was easy to attach to the side of the drawer.
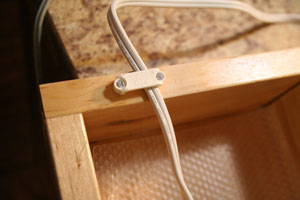
The cord is secured with a wire fastener. The drawer back was low enough that the wire goes over the back with plenty of clearance.
We used one designed for household wiring but you could use any type of cable clip as long as it's a low enough profile. You'll also want to be sure to check the clearance of your drawer. If there isn't enough room, you may have to cut into the drawer. Most modern cabinetry should allow space for the cord, though.
We chose this particular drawer in our kitchen because there is an outlet in the side right here. My husband was able to put a second outlet right next to it facing into the cabinet so the charger could always stay plugged in. It's also already on a GFCI circuit so it gives us a bit more peace of mind. That's easy to do if you have electricity close by and have electrical experience. Otherwise, hire a professional for that part.
All I had to after that, was start using the drawer.
I love it! It's been so great to have and I know it will be a lot easier to keep organized.
Sunday, August 30, 2015
Chocolate Peanut Butter Thumbprints
What combination is more classic than chocolate and peanut butter. I'm always up for any cookie that combines my two favorite things. Tonight I was up for something new, so I decided to take the classic jam thumbprint cookie and make it better. The cookie has a bit of cream cheese to keep them moist and give them a lovely tang. The filling is soft and gooey. They are, in fact, perfect.
Chocolate Peanut Butter Thumbprints
2 cups + 2 T all purpose flour
1/4 c cocoa powder
1/2 t salt
1/2 t baking soda
1/4 t baking powder
3/4 c butter
2/3 c brown sugar
3 ounces cream cheese
1 large egg
1 1/2 t vanilla
Sift the dry ingredients together and set aside. Cream the butter, sugar, and cream cheese together in a large mixing bowl. Stir in the egg and vanilla. Mix in the dry ingredients until just combined. This will give you a smooth, soft dough that holds it's shape. Using a #60 food scoop, drop balls of dough onto a cookie sheet about 2" apart. If you don't have the scoop, you will need to make 1.5" balls of dough. It helps to keep your hands damp so the dough doesn't stick to them. Once you have a full pan of cookie balls out, use a wet thumb to make a depression in each cookie. Bake at 350 degrees for 10 minutes. While the cookies are baking, make the filling.
Filling:
2/3 c peanut butter
2/3 c powdered sugar
4 T butter
Beat the three ingredients until thoroughly combined. Put the filling in a pastry bag with a large round decorator tip. Alternatively, you could use a plastic bag and cut the corner off. Remove from oven and redo the depressions by pressing a round metal teaspoon into the center of each cookie. Immediately, squeeze about a teaspoon of filling into the center of each cookie. Return the cookies to the oven and bake for an additional five minutes. Remove from pan and let cool.
Don't let them cool too much before eating because they are fantastic warm.
Chocolate Peanut Butter Thumbprints
2 cups + 2 T all purpose flour
1/4 c cocoa powder
1/2 t salt
1/2 t baking soda
1/4 t baking powder
3/4 c butter
2/3 c brown sugar
3 ounces cream cheese
1 large egg
1 1/2 t vanilla
Sift the dry ingredients together and set aside. Cream the butter, sugar, and cream cheese together in a large mixing bowl. Stir in the egg and vanilla. Mix in the dry ingredients until just combined. This will give you a smooth, soft dough that holds it's shape. Using a #60 food scoop, drop balls of dough onto a cookie sheet about 2" apart. If you don't have the scoop, you will need to make 1.5" balls of dough. It helps to keep your hands damp so the dough doesn't stick to them. Once you have a full pan of cookie balls out, use a wet thumb to make a depression in each cookie. Bake at 350 degrees for 10 minutes. While the cookies are baking, make the filling.
Filling:
2/3 c peanut butter
2/3 c powdered sugar
4 T butter
Beat the three ingredients until thoroughly combined. Put the filling in a pastry bag with a large round decorator tip. Alternatively, you could use a plastic bag and cut the corner off. Remove from oven and redo the depressions by pressing a round metal teaspoon into the center of each cookie. Immediately, squeeze about a teaspoon of filling into the center of each cookie. Return the cookies to the oven and bake for an additional five minutes. Remove from pan and let cool.
Don't let them cool too much before eating because they are fantastic warm.
Saturday, August 1, 2015
Games on Sale!
If you were interested in some of the games I recommended in my last blog post, they may be on sale today at Amazon. Today's Bonus Deal of the Day is table top games for up to 50% off. That's half off 7 Wonders, $20 off Ticket to Ride Europe, 40% off Machi Koro, almost half off two different Munchkin decks, and others. King of Tokyo is another fun one as well as Small World. My teen sons love that one.
I've got my eye on Tsuro, Tokaido, and King of Tokyo (we played with someone else so we don't own that one yet.)
What are you buying?
I've got my eye on Tsuro, Tokaido, and King of Tokyo (we played with someone else so we don't own that one yet.)
What are you buying?
Thursday, July 30, 2015
17 Games For Families With Older Kids
I have heard that old saw "there's a reason they call them bored games." Her, her. And while I understand that games aren't for everyone, if you are bored playing a board game it's likely you're playing the wrong one. There are hundreds of games out there for every interest and game playing style.
Most game wrap ups are aimed at families with young children. While we all love Candy Land and Uno there comes a point where your family has outgrown the classic children's games. Here's a few games for families with pre-teen and older kids. Kids who don't want to play Clue for the bajilionth time and SkipBo isn't bringing them to the table either.
Even though I've provided Amazon links (yes, they are affiliate links) for all these games, I recommend you buy them from a local game store. Just about every town over 30k population has a game store these days. They offer a huge variety of games (way more than I can list here) and can recommend new games based on the games your family already likes. A good store will also have open box games you can try out in their dedicated play space. Make sure you have plenty of time for your first visit so you can look around and try out a couple of games. It's even a good idea to make going to the game store a family activity so everyone can try the new games and give suggestions. Talk to the employees; they will be able to offer you good advice and help you learn how to play new games as well. Most game stores are helpful, but if you find one that feels a little exclusive and doesn't seem to welcome novices, try a different one.
Games for Mixed Aged Groups
If your family has young kids and teenagers, it can be very hard to find a game everyone can play. Teens want more complexity. Young ones need simplicity. These games balance the two needs to bring you a game for everyone without having to get out the Uno cards yet again.
Out of box play: quick
cost: $$
competitiveness: low
age range: 6 and up
number of players: 2-6 (with four being manufacturer's recommendation)
Quirkle is a tile matching game. You build sets and arrange them on the table crossword style, similar to the way tiles are arranged in a scrabble game. You can build on other people's lines and you score based on how many tiles you lay down. Scoring is simple, but the game can be made even more young kid friendly by doing away with the scoring altogether. Kids are ready to learn as soon as they can match tiles and sit through a 15 minute game. They may need to lay out the tiles so you can see them and coach them through the game the first few times. Older kids still enjoy the challenge and bring an extra level of complexity with their defensive play.
2. Dixit
out of the box play: quick
cost: $$
competitiveness: low to medium
age range: 6 and up
number of players: 3-6
Dixit is gorgeous. Each card is a different fantastical painting with planets in trees, strange dice, knights, toys, and more painted in bright colors that appeal to all ages. Dixit is a rotating judge game like Apples to Apples, but with much less subjectivity from the judge. I've yet to find anyone who doesn't love this game. Young kids may need help understanding the rules, but they will love the cards. You'll be surprised how quickly they get the concept. Games can last up to 30 minutes, but you set the number of points to win at a lower value if you need a quicker game for impatient young ones.
3. Takenoko
out of the box play: medium set up
cost: $$$
competitiveness: low to medium
age range: 8 and up
number of players: 2-4
Takenoko is frankly adorable. There's a panda. He eats bamboo that you grow for him. What's not to love? Well maybe all the pieces? There's a lot of pieces to this game and it takes longer to learn than the other games I've suggested for this age group. This is for a child who understands more complex game play. You build a bamboo garden for the panda together. You get points by making things in the garden match the cards in your hand, like growing bamboo to a certain length, making patterns with the colored garden tiles, and getting the panda to eat certain colors of bamboo. The manufacturer recommends ages 13 and up, but I've had kids as young as 5 do well with this game. They do need more help, but it's worth it. I've recommended it for ages 8 and up because it does take longer to play and it can be hard to get younger kids to focus on the game and not the cute pieces to the game. Older kids will quickly figure out how to play defensively and make it much more about strategy than luck.
Games for kids who love complex games
If your kids are bored with easy games, you're in luck. With the booming market for family games, there are dozens of fun, complex games to play, games that really make you think and work hard for the win.
4. 7 Wonders
out of box play: medium to long set up
cost: $$$
competitiveness: medium
age range: 10 and up (and 10 is pushing it. Save this for older kids.)
players: 2-7
7 Wonders has complicated instructions, but once you figure out the game play, it's fun and quick to play. If you know someone with the game, invite them over to teach you. If you have a kid into Magic the Gathering, they will be ahead of the game. My son, the Magic player, tells me that 7 Wonders is a draft deck style game. Decks of cards are passed around the table. You take one and add it to the group of cards in front of you. Points come from which cards you choose and how you combine them. You can ignore everyone else and just play for you, or you can get aggressive and play cards based on what will screw other people up. This game is different every time you play it. I have kids who hate it, but if you have kids who love complex card games, this is a good one to add to the family game cupboard. I also love it for how many people can play. When you have a big family, being able to include lots of people makes game night more fun.
5. Settlers of Catan
out of the box play: long set up
cost: $$$ (if you get into the extensions expect to spend $$$$)
competitiveness: medium to high
age range: 10 and up
players: 2-4 (up to 6 with the expansion pack)
No game list is complete without Catan. With it's varied game play, extensive extension packs, and unique set up, it's become a classic. Teenagers love this game. Adults love this game. It's a great balance of strategy and luck. Add the expansion packs, like the 5-6 player expansion, Seafarers, Cities and Knights, and others for even more fun. This one is better to learn from someone who's played before, so invite an experienced Catan friend over to teach you the game.
6. Discworld
out of the box play: medium set up
cost: $$$
competitiveness: high
age range: 12 and up
players: 2-4
If you love Terry Pratchett's books, you'll love Discworld the game. (If you don't know the books, you can still have fun. You just won't get why your neighbor keeps giggling every time she draws a card.) What makes this one complex is that each player has a different win condition. What you have to do to win the game may be different from what the other players have to do. So not only do you have to keep track of your game, you have to watch what the others are doing so you can try to stop them. There's a lot to keep track of, but that's what makes it a great game. In the mean time you can laugh at how appropriate the cards are for each character from the Discworld books. Everyone from Death to Captain Carrot to Mrs. Cake are here and ready to help you win the game.
Games for families who love card games
If board games aren't your style, but you love cards, give these games a try.
7. Machi Koro
out of the box play: medium set up
cost: $$
competitiveness: low to medium
age range: 8 and up
players: 2-4
In Machi Koro you buy cards to build a city. It's the perfect blend of strategy and luck. The set up is simple and the game is easy to learn. You can be an expert after just a couple of plays. That doesn't mean it gets boring quickly. Using dice makes each game very different. The competitiveness is going to depend on the group you play with. There are a couple of cards that make it a bit more aggressive; some groups will go for those cards first and some groups will ignore them.
8. Munchkin
out of the box play: quick
cost: $$
competitiveness: high
age range: 8 and up
players: 2-10 or so
Munchkin is wild. It's easy to learn and great in large groups. The "Deluxe" edition only plays six because you have a board to keep track of score with. Keep track of score on paper and you can play as many players as you have cards for. More than 10 can get unwieldy and long, though. Munchkin is good for kids who have played fantasy type games like D&D. It's pokes fun at genre tropes in a great tongue in cheek way. The additional decks can be added to your original or you can skip the starter sets and just play with the expansions on their own. There are over a dozen now and it seems they come out with a new one every year. You can send monsters to each other to keep people from advancing levels or winning the game, so be sure your family can handle the aggressive play before you bring it home.
9. Killer Bunnies and the Quest for the Magic Carrot
out of the box play: quick
cost: $$ (expect to feel the need to add $$$ as you buy the expansion decks)
competitiveness: high
age range: 8 and up
players: 2-10 depending on whether you have expansion decks
Killer Bunnies is crazy. It's mean. It's complex. It's addictive. I highly recommend playing this with an experienced player the first few times through. The expansion packs add new bunnies and more fun to the game. When I say it's competitive, I mean it. You attack other players; they attack you. It's the game. If your family loves highly competitive games, they will love Killer Bunnies.
10. Love Letters
out of the box play: quick
cost: $
competitiveness: medium
age range: 8 and up
players: 2-4
Love Letters is a simple, well designed, and pretty card game. There are only 16 cards in the deck and it comes with it's own little velvet pouch, making it very portable. I actually keep this one in my purse. The game is very easy to learn and quick to play. It's not going to be everyone's favorite game, but it's a great choice when you only have a few minutes to play or don't want something more complex.
Games for story tellers
Do you have a child who loves to talk? Do they argue passionately for their side of things? Do they have three different notebooks full of stories squirreled away that they work on constantly? Story tellers and imaginative players will love these games that give them free reign to go wild.
11. Story Cubes
out of the box play: quick
cost: $
competitiveness: very low
age range: 6 and up
players: 1 or more
With Story Cubes you roll the dice to tell a story. Each player takes a turn telling a piece of the story based on the symbol of the dice. Younger kids love this one and it's a great one for mixed age ranges. Kids with great imaginations who love to write or tell stories will love story cubes. They are also a great educational game, teaching narrative and cause and effect among other things. The manufacturer recommends 8 and up for this game, but your kid can play as soon as they can follow and tell a story. This one is great for a large group.
12. Gloom
out of the box play: quick
cost: $$
competitiveness: high
age range: 9 and up
players: 2-5
Gloom is dark. It's depressing. It's so very, very fun. Do you know someone who takes great pleasure in telling you how awful life is and how bad theirs is specifically? This game takes that idea, turns it on it's head, and pokes fun at it. Everyone has a family that they try to make horrible things happen to before they kill them off. The other players are trying to make your family's life better. The person with the absolute worst family life wins. Good story telling makes this one even more fun because you are supposed to tell the story of the miserable event you just laid down on your card. The better the story tellers, the more fun you'll have.
13. Snake Oil
out of the box play: quick
cost: $$
competitiveness: high
age range: 10 and up
players: 3-10
Snake Oil is another great game by the makers of Apples to Apples. This one pits players against each other as they try to "sell" their crazy product to the "customer." Watch out for players talking over one another; this one gets loud as the sellers get more impassioned about their products. My kids love this one. It's great for large groups.
14. The World Needs More Jet Pack Unicorns
out of the box play: quick
cost: $$
competitiveness: high
age range: 8 and up
players: 3 and up
In Jet Pack Unicorn players argue with one another to prove their what if scenario is the coolest, weirdest, or worst. The game is easy to play and pretty portable. This one gets crazy and loud. The better at BS you are, the better you will be at this one. This makes a great party game and is good for big families.
Cooperative Games
If your family loves to work as a team or just needs a break from competing against one another, cooperative games may be for you. In a cooperative game you work together to win the game, making it a great game when you need to build family unity or include a child who might be too young for another game. It's great for teaching strategy to younger kids and making everyone feel included and important.
15. Forbidden Island
out of the box play: medium set up
cost: $$
competitiveness: low
age range: 8 and up
players: 2-4
Forbidden Island pits the group against a sinking island. You each have a different skill that helps the group. The game mechanics include methods for making the game easier or harder depending on what you feel like playing that day. We've also found that if we take out one of the "waters rise" cards we can play 6 players. It puts the game at the experienced player difficulty but it's nice to get everyone around the table for a game. If you do this, make sure everyone is discarding unneeded cards quickly to make the discard pile as big as possible. It's also best to play several times with just four to get the hang of game play before you try to add in additional players. The designer also has a game called Forbidden Desert that plays very similarly.
16. Pandemic
out of the box play: medium set up
cost: $$
competitiveness: low
age range: 8 and up
players: 2-4
In Pandemic your group must save the world from four viruses that are sweeping through the population. It was also developed by the same game designer as Forbidden Island, so some of the game mechanics will feel familiar if you've played that one before. It's also possible to make this one a six player game, but it's much harder and you have to go for the win quickly. There's several expansion sets for Pandemic, a couple let more people play and one does add a "bad guy" who's working against the group.
17. Elder Sign
out of the box play: medium to long set up
cost: $$$
competitiveness: low
age range: 12 and up
players: 2-8
Elder Sign is a great game for your teenagers. The game play is based on HP Lovecraft so if you've got a Cuthulu fan in your house, they will enjoy this game. The game play is pretty complex, so even though it's cooperative, it's best not to try and play it with younger kids.
You may have noticed a few popular games I didn't list, like Ticket to Ride and Apples to Apples. You can tell me what I missed. What are your favorite games?
Thursday, July 9, 2015
More Vinyl than any one wall should have
A couple of months ago, right in the middle of my busiest month substituting, my husband asked me if I would be willing to do some vinyl work for his bosses. They were putting in a second office and wanted an inspirational quote wall. Not just a couple of quotes, but as many as I could fit on the wall.
This is what I ended up with:
The final design is approximately 11'x6' with ten different quotes. I used Oracle 358 because the wall is textured and I wanted to be sure it would stay.
Hanging a wall like this is a huge undertaking and I learned a lot doing it. If I could go back, I probably would do a few things differently. Things like I pieced more than I had to because I was worried about making sure the quotes were spaced properly. I would try harder to not piece in the middle of words. Some of those black boxes are in three pieces and took some clean up time with an Xacto knife to get them looking like they should. I might even have gone to full outdoor rated vinyl as well. Textured walls just don't like vinyl. It's hard to get it to stick.
The design was a challenge, but I'm very happy with how that came out. I looked for inspiration for quote walls on the internet but just about everything is plaques or only has one or two quotes on it. There just wasn't anything like this out there. I could have used more quotes, but I wanted the letters to be large and have a big impact. The boss said to "use lots of fonts" which is customer speak for "make it interesting, please." You might notice there's only two fonts here, Playball and Potterybarn. I added visual interest with the black word boxes. Playball was a dream to work with. Loved it. Potterybarn looks great and paired beautifully with Playball but those serifs drove me nuts.
I enjoyed this job. It was a challenge to do the physical work, but I loved best getting to exercise my creative muscles. I love working with fonts. It's amazing what beautiful things you can make just with text. Words are lovely, aren't they?
This is what I ended up with:
The final design is approximately 11'x6' with ten different quotes. I used Oracle 358 because the wall is textured and I wanted to be sure it would stay.
Hanging a wall like this is a huge undertaking and I learned a lot doing it. If I could go back, I probably would do a few things differently. Things like I pieced more than I had to because I was worried about making sure the quotes were spaced properly. I would try harder to not piece in the middle of words. Some of those black boxes are in three pieces and took some clean up time with an Xacto knife to get them looking like they should. I might even have gone to full outdoor rated vinyl as well. Textured walls just don't like vinyl. It's hard to get it to stick.
The design was a challenge, but I'm very happy with how that came out. I looked for inspiration for quote walls on the internet but just about everything is plaques or only has one or two quotes on it. There just wasn't anything like this out there. I could have used more quotes, but I wanted the letters to be large and have a big impact. The boss said to "use lots of fonts" which is customer speak for "make it interesting, please." You might notice there's only two fonts here, Playball and Potterybarn. I added visual interest with the black word boxes. Playball was a dream to work with. Loved it. Potterybarn looks great and paired beautifully with Playball but those serifs drove me nuts.
I enjoyed this job. It was a challenge to do the physical work, but I loved best getting to exercise my creative muscles. I love working with fonts. It's amazing what beautiful things you can make just with text. Words are lovely, aren't they?
Monday, June 15, 2015
What I've Been Working On
So between me working 40 hour weeks in May and the run up to my parent's 50th wedding anniversary bash, I haven't have a lot of time for blogging. I've also been busy working on transforming my front room.
When we originally moved in, it was the living room. It was also 1980's doctor's office mauve. If you lived in the 80's you know exactly what I'm talking about here. It was that dusty pink/purple that went with country blue. I'm sure your picturing the tiny flowers on the wallpaper now. Needless to say, we painted it pretty quickly. I went with a lovely sage green. I've enjoyed it, but it was worn out and needed re-done. I decided it might be time for a change of color as long as we're going through the trouble of painting. Then I got thinking about other changes we could make.
So I talked my husband into this:
I'll take better pictures soon. I have never been happier with my house. It's been a long process, but I have found over the years that, contrary to popular style fads, the more color I add to my home the happier I am with it. I would never have been happy with the room if I had painted the space above the wainscoting Sherman Williams Sea Salt like everyone else. I need color.
Never be afraid to do your own thing in your home. You do not have to decorate to make the online bloggers happy. They mostly live in UT; they probably won't visit you anyway. I read blogs to check the style trends to see if there is anything I might like and to learn some great design lessons. You can take design tips and use them for the things that work for you.
I'll post better pictures in a bit. I want to get a new centerpiece put together and I have to paint the eighth chair.
When we originally moved in, it was the living room. It was also 1980's doctor's office mauve. If you lived in the 80's you know exactly what I'm talking about here. It was that dusty pink/purple that went with country blue. I'm sure your picturing the tiny flowers on the wallpaper now. Needless to say, we painted it pretty quickly. I went with a lovely sage green. I've enjoyed it, but it was worn out and needed re-done. I decided it might be time for a change of color as long as we're going through the trouble of painting. Then I got thinking about other changes we could make.
So I talked my husband into this:
I know, all that big talk about how "my house shouldn't look like other people's houses," and I go with board and batten wainscoting. It looks pretty, though. I'm very happy with it. The picture ledge is fabulous. I console myself with the fact that only four people on the planet have that pear picture (I only gave/sold three copies of it. It's mine. It will also have a red "mat" as soon as I can find the blasted picture file.) and that paper cut is a custom SVG done by my lovely friend Helena. She sent it to me to do a cut test. I loved it so much I framed it.
Here's a close up of the pillow:
That bench is right by the front door. I figured at my age, a little memory prompting can only be a good thing. The words are iron on vinyl. The fabrics are the leftover pieces from the pillows in the sitting room. Since I used the same color scheme, it was a great way to tie the two rooms together.
Here's a terrible picture of the other side of the room.
Never be afraid to do your own thing in your home. You do not have to decorate to make the online bloggers happy. They mostly live in UT; they probably won't visit you anyway. I read blogs to check the style trends to see if there is anything I might like and to learn some great design lessons. You can take design tips and use them for the things that work for you.
I'll post better pictures in a bit. I want to get a new centerpiece put together and I have to paint the eighth chair.
Subscribe to:
Posts (Atom)