Monday, December 5, 2011

Appliqued Towels

I have a friend who is afraid of her sewing machine.  Which works for me because she also owns a Cricut and vinyl.   I sewed a project she wanted for her kids and she's going to cut me a vinyl phrase.  I hope she knows what's she's getting into because my phrase is going to be about 30" long.  

I hope these towels are worth it for her:
I made two.   One for her girl and one for her boy.

I started with a print out of the CTR shield from lds.org.  I tried to find a link for you, but was unsuccessful.  I'm sure it's there somewhere.  This is super easy to do with any design, however.  You could do a monogram  for a child or newlyweds, too.  

I traced the image onto a piece of paper backed sewing adhesive.   You could probably print directly onto the paper, but my printer was acting up.  Just make sure you print your design mirrored.

 I just held the design up to the window (great big light box!) and traced it that way.  You'll notice all the letters are backward.  This is important.  

Next iron the design onto the back side of your fabric and cut the design out.
 Then fuse your design to towel one section at a time.  Play around with the design on towel to make sure you get the placement exactly where you want it.  It's impossible to change after this step.  

I saved my scraps with the paper backing still on when cutting out.   I ironed down the big shield shape first then I used the scraps to make sure I got the letters placed exactly where they belonged.  They did slip slightly though when I was iroring them down.  Working with towels is a bit difficult.

 Here's the design fully fused to the fabric.  It's ready to sew.
 You want to set your machine to an extremely tight zig zag.  Mine is down in the "buttonhole" size for length.  I'd give you exact numbers but my machine is not digital so I have no idea.  It's very close with no visible space between the zig zag stitches.  My stitch width is just barely smaller than 1/8th of an inch.  I kept it on the narrow side because of the narrowness of the design.
Sew around all the edges of the design.  You need to cover everything.  Notice how the foot and needle are placed.  You want the stitch to be almost entirely on the applique with less than 1/4 of it over the edge.  This will keep the applique from unraveling later as you wash it.  The nice thing about tight stitches like these is it's so easy to go slowly and take your time.  Don't hurry through this, you want to be sure your stitches are placed properly and your lines are straight.  When you sew the curves turn the fabric into the needle.  Curves can be tricky, so practice if you haven't sewn a lot of them.

And here it is all sewn down.  You can see my threads still because I'm tying them off instead of just cutting.
 I do this by threading a needle with the thread ends and pulling it down to the back side of the towel.  Then I tie a surgeon's knot and cut the ends as close as I can to the fabric.  This will help keep the thread from unraveling as the towel gets used.  Towels need to be sturdy and ready to put up with years of laundry and abuse (I don't know about your house, but towels get dropped on the floor and walked on a lot at mine.  Not that I like that happening.  We're working on it.  It's a lifetime project.)
 And you're done.  This is a great project for a niece or nephew for Christmas, too.  Do a Superman or Wonder Woman shield and you are the coolest aunt ever.   If you are doing several and use sale towels you should be able to keep the costs down to under $5 a towel.

Friday, November 25, 2011

Chocolate Sandwich Cookies

Have you tried one of those mock Oreo recipes before?  You know the ones with the "1 cake mix" in the ingredient list.  I don't know about you, but those don't taste like oreos to me.  Oreos aren't just any old chocolate sandwich cookie.  They have to be thin and crispy and with an intense chocolate taste.

Several years ago I found the perfect cookie make Oreo type sandwich cookies with.  It's a recipe from Martha Stewart that I adjusted to fit what I was looking for.
Intensely chocolate.  Crispy.  Perfect.  You can make yours into circles if you wish.  I was feeling lazy and a quick zip a few times with the pizza cutter worked great for squares.

Chocolate Sandwich Cookies:
1/2 c butter
1/2 c sugar
1 large egg
1 cup cocoa powder  (yes.  1 full cup)
1/2 c + 2 T flour

Cream the butter and sugar.  Add in the egg.  Mix in the cocoa powder and flour.   Divide the dough in half and wrap each in plastic wrap.  Refrigerate the dough for one hour.

Preheat oven to 350 degrees.  Using powdered sugar on the counter to prevent sticking, roll out dough to 1/8" thickness.  Cut with 2" cookie cutter and place 1/2" apart on cookie sheets.  Bake until you smell the chocolate, aprox. 12 minutes.

I do suggest you use parchment paper on your cookie sheets because these have a tendency to stick quite badly.

I used a basic American butter cream to frost the centers.  I have four rules for better butter cream:
1.  you should use at least twice as much butter as you do cream.  Meaning if you use 1/4 cup butter you should only use 2 T of heavy cream.
2.  Use lots of vanilla.  I like to use 2 t as a starting point.  I may add more later.
3.  Use salted butter or at least add a pinch of salt to your frosting.  You won't believe what a difference it makes.
4.  Beat the holy heck out of it.  I beat my butter cream for at least five minutes and as long as ten minutes.  This makes it fluffy and light and it makes sure the powdered sugar has time to dissolve so you don't get that raw taste.

You could also use a nice ganache (Martha used ganache with mint extract), or jam, or cream cheese frosting in your cookies.

Wednesday, November 23, 2011

A Photography Rant

Never use your flash. Right?   Wrong.


That single most used piece of photography advice available on the internet is garbage.  Any photographer who spouts it is an amateur.  If the photographer you've hired for family pictures uses it, you might want to rethink hiring them.

Have you ever seen a professional photographer at a wedding without a flash on their camera?  That's because they know something those amateurs do not.

Flash lighting exists for a reason and that reason is not every subject comes with perfect lighting. Sometimes you've got back lighting, or overly strong side lighting or just plain not enough lighting.  If you have to use a tripod because your shutter speed is that slow, chances are a human being in the photo isn't going to be able to hold still well enough either.  That's what flashes and strobes and hot lights are for.  They fill in and add enough light so you can take the picture.

This doesn't mean that I think we should all go back to the deer in the headlights straight on flash.   What you should do is learn to use it.   There are a ton of really great tutorials on the internet about flash photography.  Instead of telling yourself flash is evil, do some research.  Practice.  Figure it out.  Your camera flash can be one of your best tools if you know what you are doing with it.

For example, this is my sitting room.  This picture was taken without a flash using a tripod.  Notice how dark the chairs are.  There's no detail because of the high contrast from the back lighting.  I could mess with the contrast levels in photoshop and try to come up with something acceptable.  But why?


When I could just get my accessory flash and bounce it off the ceiling (with a Lightsphere attached) and get the lighting I need.   


Some of you may say you like the first photo.  Fine, but you have to admit that when my purpose of taking the photograph is to show the furniture and the room, the first photo doesn't cut it.

I'm not going to tell you I'm a flash expert.  I'm definitely not going to claim that all photography on this blog is fabulous. (The vast majority of is is far from not fabulous because I am fabulously lazy.) I will say this:  learn to use your flash.   Buy accessories for your flash so you can use it to best effect.  Then learn some more.

Anytime you lock yourself in the box of "never" doing something with your craft, you lose.  Don't say "never."  Say, "learn."  And for heaven's sake, check someone's credentials, including mine, before you follow their advice.

Tuesday, November 15, 2011

Mid-Project

Ok, I'm not done yet, so be gentle.


I told you the room was small.   I am pretty happy with how things are coming together over all.   I'm not so sure about the plant.  That one was my husband's idea.  I'm not a plant hater, I just don't like them in my house.  I kill the suckers, for one.  I've managed to kill a philodendron and a spider plant among many others.  When you kill a philodendron you know you shouldn't have plants in your home.   Reason two:  I haven't the slightest idea how to use plants in decorating.   Yes, I do intend to get the poor thing a real pot sometime before I kill it.

So here's the plan for what's coming up in the near future:

The squares on the left will be the handkerchief collection.  The one on the right is my landscape photo.  I have the large frame already for the right side of the room.  It's painted deep turquoise and waiting for me to get the matting done.  I've solved the cost issue with that so it should be done by next week.  (If money and time come together correctly.)   As you can see I also plan on new throw pillows for the couch.  I was originally going to do cushions for the chairs as well, but I love the hand caning so much I'm not ready to hide it yet.  

The rug is definitely too small.  My solution for that is to sew a dark brown 12" burlap border all the way around it making the rug a 5'x7', which should be about right for the room.

The funky circles in the corner is my attempt to somehow visually compensate for the off center window.  (And boy howdy, do I hate that off center window.  There is no earthly reason for that window to be off center.  None.  Nada.  No excuse.  Just another reason to be annoyed with the people who owned this house before us.  I could tell some stories . . . .) anyway, I'm thinking right now it would be fun to put brightly colored paper lanterns there, three or four to match the space.   I'm also hoping to get the window trimmed out with moulding.

The little tables will be painted but I haven't settled on the color.  Back when the walls were ugly beige I was sure I needed them to be a light color like white or golden yellow.  Now that the walls are all light and bright, I'm kind of liking the dark brown.  I think that will be the last decision I make in the room, because I just have no clue what to do with them.  They do have to be painted though.  The stain is pretty dated and scuffed and  my children thought it would be fun to practice their knife work in the top.   "Mr. Happy Face" just isn't something I want permanently on display in the room.

Farther into the future, we hope to lay down some kind of wood floor whether it be the real deal or laminate will be determined by budget.  We're also planning on putting in a 5' set of French doors on the left.  It would be positioned just out of the frame there.  Then there's the three piece base moulding to match the living room and the crown moulding . . . .

There's always so much to do, but I'm so happy we're doing something.   This project has got us talking about the rest of the house as well.  Maybe in a year I'll have this house so cute I won't want to move.

Monday, November 14, 2011

This is what happens when you let you children help


That's a dinosaur on my wall.  If you look carefully you can see he's a biped because he has very short upper arms.   That one is thanks to my Matthew.  
He painted a triceratops for us as well.

Yes, the beige paint was really that ugly. It had this undertone of pink that really looked awful in that room.  I disliked it from the moment I painted it on the walls.  And then I mixed up paint samples and painted it again.  Not kidding.  I lived with it because I didn't have anything else to do with it.

I love the blue.  It's very light, but very blue.  We did a light grey on the ceiling.

And this is how we cut in over the stairs:
That's a 2x12 carefully supported on each end suspended over the stairs.  I take no responsibly if you try it yourself and you fall.  However, it worked really well for us.

Budget update:
chairs               $20
rug                  $40
picture frame    $20
small tables      $30
light                  $10
paint                $120

Total so far:    $240

Anyone who says paint is cheap, isn't working with my budget.   I'm almost halfway to my budget ceiling and there is still a lot left to buy.  The rug is a 3x5 instead of a 5x8 so I need canvas or burlap to expand it out (the rug is woven not pile so it will work.)  I'm still stuck on how to properly frame the handkerchiefs.   I would love to be able to take them to a frame store with color samples for the room and say "make it pretty.  I'll be back in a week."   Unfortunately, that would take over $150 to do all three.   If anyone has any ideas for me I'm ready.

I also need to figure out how to add lamps to the room.  The couch is just too large to fit side tables next to it.  I could set the couch off center in the room, and add a table to one side.  There is the perfect lamp at Target ($20 for base another $20 for a shade, but shades are cheap at thrift stores.)   Still working on it.  I may try rearranging the furniture as well to see what can be done.

Progress pictures probably will be up tomorrow.

Monday, October 10, 2011

Chevron Clutch--the prototype

I haven't been posting as much lately because it seems that just when I'm going to finish a project something comes up.  I have about five things I want to post on my blog that I can't post because I haven't managed to do those finishing details yet.   We've found and painted a light for the new sitting room.  We've built a 6' DVD case that holds (almost) everything including Wii games.  We even punched through the wall in our family room to put in a component shelf under the TV so we could finally get rid of (what remained of) the entertainment center.  I love all the projects but we've managed to just live with them 95% done.   That is the fun of having a blog.  It makes me finish things I would otherwise just live with.

Just for fun though, I'm going to show you an in progress project.  I'm working on the pattern for a large clutch.  The prototype looks promising but there's a few things I'll be changing up in the final version.


I like the chevrons.  I like the size, 12"x6".  I even like the button.  I'm not too happy with the fabric, but it was free, so I'm not sweating that.  The thing that bugs me the most is the way the flap does not lay down smoothly on the sides.  That will have to be worked with.

The back side has two more chevron stripes.  I think the stripes are cute and I do like the way the fabric is fraying.  It made it super easy to sew the stripes on, as well, so bonus!


I do love the interior of this clutch.  The great big zipper pocket was easy to put in.  I have just ID/credit/membership card pockets on the other side.  Of course, these days I'm not sure if 9 pockets is enough.   Between the library card, the zoo card, the museum card, the grocery store loyalty cards, the clothing store loyalty cards. . . there may actually not be any space left for my driver's licence or debit card.  hey! This clutch saves money!  Obviously I can't drive anywhere or spend money when using it.   It's the budget clutch!

I'm going to work up a final version of this one soon.  Hopefully I can figure out how to make digital patterns as well.   From the numbers on my blog, an Etsy store with just the ruffle bag patterns in it would do pretty well.  I'd put other stuff in it too, of course.  Two products would just look silly.

Tuesday, October 4, 2011

Finding my style

It's been interesting planning my living room redo.  (Which by the way I've decided to call my sitting room.  It's just sounds cozier and since the room is small and cozy, sitting room works for me.)  Anyway, the interesting part is getting to bring new stuff into my decor in a planned way.  Previously most of my decorating involved more serendipity than planning.  I found something I liked or I dug something out of box and then found a place for it.   Things happened in a very slow way and no room in my home has ever been fully decorated, at least decorated in a way that made me happy.

This time I'm planning.  I've got my inspiration board on Pintrest and I have a vision in my head of what the room will look like.  It's exciting and fun.  It's also been very revealing.  I've looked through a lot of inspiration photos both online and in print.  There's so many beautiful rooms out there. I love the look of the random plate collections and the milk glass and empty frames, however, none of those things will every be in my house.  I like the white rooms too, they look so tranquil, but they won't ever be in my home either.

I've discovered two things:  1.  I love color.    The color thing is obvious.  I am a woman who owns a red couch.  I full intend at this point to own a red couch for the rest of my life.  I love how cheerful colored walls look.   You won't find me sewing white slipcovers and painting the walls "soft bone" or "winter chill."

2.  My decor must be meaningful.  Not so much the furniture, partly because, quite frankly, both my husband and I come from a long line of families with lots of children and very little heirloom quality furniture.   The wall decor and the knick knacks need to mean something to me.  I have a small home.  I have purged a lot of stuff over the years that I don't love.  I discovered that for me to love and want to keep something it has to have a memory or at least an emotion associated with it.  Pretty alone doesn't cut it.  I love decorating with photos of my family, with the small heirlooms I do have.  Not just things.

I want to hang my walls with memories.

So as I start collecting the things that go in that room, there might be one or two just things, but just about every item will have a memory associated with it.  I'm really going to love having a little piece of my grandmother's talents, and a memory of a family vacation, and all the little things we love and cherish right there.

What has a decorating project taught you about yourself?  Do you go for collections?  Do you like busy full rooms, or clean, clutter free rooms?  Which way are you leaning on the great white trend of the 'teens?  How do you choose what to decorate with?

Thursday, September 29, 2011

My Handkerchiefs

Isn't it lovely?  Ok, so its' not the best photograph.  I need to work on that.  Semi translucent handwork is not the easiest thing to take photographs of.  I think I do a better job with two year olds.  At least I have more practice at it.  

This is my favorite of the three.  It's English silk and was a gift to my great great grandmother (I got the greats wrong on a previous post) from her sister.  Aunt Louisa lived in England and did not emigrate when my great great grandmother did.  Louisa still kept in touch with her sister and came out to visit on more than one occasion bringing lovely handkerchiefs with her as a gift.  
 Here's a slightly better look at the detail.  This particular handkerchief is all machine made, but I really think it's still lovely and I love the story of the sisters who didn't let thousands of miles separate them.  Imagine how difficult it was for Louisa to come out west with trains barely coming through and having to cross the ocean in a steamer ship?  It must have taken weeks.
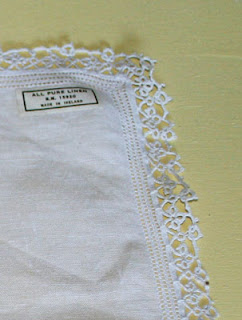
 This is my grandmother's tatting work.  She liked to purchase premade hankies and put lace edging on them. They were designed for this with tiny little squares all around the edge of the hankie so the lace maker could work the lace directly onto the handkerchief.
 As you can see this particular hankie is Irish linen.   Get a gander at that tatting.   Can you imagine tying that many knots?  My grandmother loved to tat and she did beautiful work.
 This hankie was purchased with the flower machine embroidered already on it.  Grandma used colored thread for the lace for the contrast.  It worked well didn't it?  It's a striking hankie.   This one is a polyester blend.
 As you can see the lace here is crochet and mixes white thread and red together to form the design.  My mom said that when she was a girl they would often make a special trip into the next town to a sewing store there.  That particular store carried a good variety of colored crochet thread and my grandma loved to work in color.
My mom had so many of these.  It was so hard to choose just three.   I can't wait to get them framed and hanging on my wall.  They'll all be framed on a colored mounting cloth.  I'm thinking velvet or velveteen.  The frames will give me fits because I need at least 14" square frames.  We'll see what I can get figured out.  I do know that if I make my own I can have glass cut for them quite cheaply at the glass stores in the next town over.    They will be framed with their stories attached.  The story is what makes them more than just a pretty piece of fabric.

Monday, September 26, 2011

Remembering

Many years ago when my grandmother passed away my mother and her sisters went through her things and divided up much of it.  Sadly, as they went through her cedar chest, much of what they found had no meaning to them.  There was no story or memory they could attach to the items.  They had beautiful lace, dresses, embroidery that was without meaning to them.  They knew it was special to their mother and that's all they knew. 

So today I spent time with my mother cataloging her cedar chest.  She emptied the chest onto her bed.  I took a picture of every item.  Mom told me about them, who made it, where it came from, where it was used.  For the particularly special items, I brought my video camera to record Mom telling about it.  I think my favorite video is the one with my Great Grandmother's hair combs and pins.  She is going to take the photos and type up everything she knows about the items.  The document will be printed out and put in the cedar chest.

I came home with three vintage handkerchiefs.  Two have hand worked lace edging, one crochet, the other tatted.  The third handkerchief is well over 100 years old, silk, from England.  I know that my grandmother did the lace edging and that my great grandmother's sister would bring handkerchiefs with her as a gift when she came from England for visits.  The silk handkerchief is one of those gifts.  These are my "payment" for helping.  I'll be archivally framing them and hanging them as wall decor in my new living room.   They will be beautiful and will make me happy every time I look at them.

I'm also happy to know that when the time comes for my sisters and I to go through my mother's cedar chest without her we will know the stories.  

I guess I'm just telling this story because I think everyone should document what they have.  We won't always be around to tell someone else about why that stack of envelopes is special or who crocheted the lace on that pillowcase.  There are a lot of things in our lives that are priceless to us and worth little without the story to go with them.  Make sure the people you love have the stories.  

Friday, September 23, 2011

Chocolate Chip Cookies For the Cheapskates

I adore cookies.  I love making them.  I love eating the dough.  I love the reaction my family has to a freshly baked batch of cookies.  I love eating a cookie straight out of the oven.  Cookies are Love.  (And my thighs and backside show how much love I have in my life.)

Here's the recipe, with a story to follow about the ingredients and how I cut costs without cutting flavor.


Cheapskate Chocolate Chip Cookies

1/2 cup margarine
2/3 c vegetable shortening (butter flavor is nice too if you have it)
1/2 c white sugar
1 1/2 c brown sugar
2 t vanilla
2 eggs
1 t baking soda
1 t salt
3 cups flour
1 1/2 c chocolate chips
1/2 to 3/4 c nuts (optional)

Cream the margarine, shortening, and sugars.  Mix in the vanilla and eggs until well blended.  Stir in the baking soda, salt, and flour.  Stir in the chocolate chips and nuts.  Drop 2 T size balls onto ungreased baking sheets and bake in a 350 degree oven for approximately 12 minutes.   Remove from oven when edges are golden brown and the very center looks just a little doughy.  Let rest on cookie sheets for five minutes, then put on cooking racks.  Try not to burn yourself eating them hot from the oven.


The story:
  My favorite cookie recipe over the last few years has been the chocolate chip cookie recipe from ATK.  It painfully calls for half a pound of butter and four eggs.  That's on top of the package of chocolate chips, nuts, and the other ingredients that all recipes call for.  That makes a batch of cookies cost around $7 these days.  As much or more than I budget for dinners.  Sadly, with the recent price hikes at the grocery store and the lack of paycheck hikes going on our household, I had to rethink our food budget and pricey cookie recipes just don't work for us anymore.

Something had to change.  My first step was to go back to my old favorite from years ago that called for margarine.  I can hear you screaming from here.  Yes, I know that butter is healthier and it's nicer and it makes babies happy and brings you kittens, rainbows and happy thoughts.  Butter is nice.  Butter is also $3 a pound for the store brand.  $4 a pound if you want something with actual flavor.   Margarine is 1/3 to 1/4 the price.  Since cookies aren't that healthy for you anyway, I don't sweat the margarine.

I also use Crisco.  Purists and foodies can leave now.  The rest of you stick around.

My second step was to stop buying chocolate chips at the grocery store.  I have my mom pick me up a huge bag of semi-sweet chips at Costco.  This is the industrial size bag in a brand I've never heard of before, Ambrosia.  They are good chips, no Ghiradelli's but we're trying to save money here.  When I get these chips I have to measure them out for each batch of cookies.  If I leave them all in the big bag, they get eaten (by my husband.  Not so much by me.  I'm a milk chocolate girl.)   Instead of doing 2 cup portions, a full 12 oz. size, I do 1 1/2 cup size portions.   It gets me several extra portions of chips out of the package. I promise, I don't miss that extra half cup of chocolate chips. Last time I had 17 sandwich bags of chips from one big bag. It worked out to be less than $1.50 per baggie.  That's about $3 less than brand name chips per batch. I throw the sandwich bags back in the resealable original bag and put it in the freezer for long term storage.  It's probably not the way you'd treat premium chocolate, but it's great for chocolate chips.

I also use imitation vanilla for cookies.  There's almost no difference in flavor in baked items between imitation and the real deal.  If you consume cinnamon you aren't allowed to pull the "imitation vanilla is made from tree bark" argument.  Food comes from all parts of plants.  I'm ok with that.

The ATK cookies are still part of my cookie line up, but they are reserved for special occasions and guests.  For the occasional after school snack, Cheapskate cookies are just fine.  I figure my less expensive cookies cost approximately $4 less to make than the ATK version.  They still taste like Love even without the butter.

Thursday, September 22, 2011

Small Camera Bag Hack

I have an SLR camera with a very large bag that holds most of my equipment.  It's a backpack style, which is nice to carry because I can bend over and lean while wearing it without worrying that the bag is going to swing around and whack somebody.  As long as I wear both straps I don't whack people, I mean.  Don't ask me what happens when wearing just one strap.  It's not pretty.

The problem is that it's a very big bag that is very heavy.  This summer was very busy with lots of trips.  The full size bag would be way more equipment than I needed and I knew I couldn't hike 26 miles in it.  I needed a camera bag that would carry just the camera and one lens.  Ideally, I would have had a Crumpler sling bag, but since I didn't want to spend $50, I was out of luck.  

So I made my own.
I started with a $3.99 mini backpack purse from Salvation Army.  It had the right size main compartment and a little zipper pocket on the front for an extra battery, flash cards, and ID.  The heavy duty nylon canvas would put up with the abuse of a hand cart trek, a trip to the beach, and all around travel.  It's not the prettiest, but hey, you can find a prettier one for yours.

The grey block in the picture is the secret to this project:  high density foam.  Regular foam probably isn't going to do it.  You need the the super good stuff.  This is the product they use to protect lots of delicate equipment and my husband just happened to have a little bit in storage.
I sat the bag on the foam and traced around the base with a pen.  This was a little bigger than the foam needed to be, so I cut it just a bit smaller and rounded off the corners.  I made two of these.   Then I traced around the lens that I wanted to use in the bag.  This time I cut the foam out a little larger than what I traced.   In one block, I cut the circle all the way through.  In the second block I cut it only halfway down.  That was a pain, and it's not pretty, but it works.

I made sure the two foam blocks lined up at the lens hole.  Then I shoved them into the bag.  The camera fits in the bag lens down.  Like this:
On the sides, I cut spare blocks to fit around the body of the camera.  It would be best if one were to glue the foam together into the proper shape.  I'm lazy and have no clue what kind of glue to use, so my foam is still in pieces.  Nevertheless, this bag has been perfect.  I took this with me on my 26 mile hand cart trek.  My camera came through with nary a scratch or bump even after a torrential downpour and ridiculous amounts of dust.   It went to the beach with no problems as well.  Not that I went around dropping the bag in the surf, but it did well in the salty, humid air.  

If I were to upgrade this, I would probably try to find a leather bag.  Then I'd actually glue the foam and hopefully cover the whole foam block section in a nice printed fabric for contrast and fun.  Otherwise it's been great.  Today, my camera goes with me to a cross country meet.  I love taking the lighter bag.  My back thanks me too.

Wednesday, September 21, 2011

Living Room Redo: The chairs

Yeah, this is the third time I've posted that photo.  I just love my chairs.  I found them at Salvation Army for $20 for the pair.  They were an ugly, dark walnut stain that was worn and dingy.  I'm kicking myself for not getting before pictures.  The transformation is so wonderful.

The chairs were hand made by a Mr. Juan Carlos Garcia in Antigua, Guatemala.  He left that information carved into the front apron of the chair.  My favorite part of the chairs is all the gorgeous hand carving.  Don't you just love that flower and scrolling?  In the dark stain, the carving just got lost.  The color really brings attention to the details on the chairs.


This is the harp shaped back support.  More lovely flower and scroll work.   You can see a bit of the caned seat in that photo too.  The caning was hand woven and isn't an applied piece of fabric.

I don't often find fabulous buys at thrift stores, but this time I think I really scored big.  I love my chairs and I love that they are bright and happy.  Next step is either the floor rug or the paint.

Tuesday, September 20, 2011

Living Room Redo: The backstory

So, the whole living room thing.  There's a story to that.  We moved into our house nearly 10 years ago.  We had three children at the time and I was pregnant with number four.  We figured we'd spend five years remodeling and sell for a profit.  The problem was we spent eight years (and we still weren't finished) when the market tanked.  So we're kind of stuck, just like 90% of America right now.  

One of the things I disliked about my house from the very beginning was that there was no separate eating area.  No eat in kitchen.  No dining room.  If I wanted to eat at a table with my family the table had to go in the same room as the couch.  So for nearly ten years, my dining room and my living room have been one in the same.  One in the same 12x19 foot space.  Not even kidding.  The room is big enough to be an acceptable living room, but you add in a full size upright piano and a table and chairs to seat seven, and things get very tight, very quickly.   I've put up with it,  though, because I didn't have a good solution to my problem.

We also have another room in the addition.  It's kind of a weird space and small.  We've used it as an office and later as a play room.  My kids are all getting older though.  I only have two who still play with toys, so a designated play room just didn't make sense anymore.  

Two weeks ago we took down the playroom and made it the living room.  The redo is slow going.  I'm hoping to have it done by Christmas.  I'm very excited.  I am already enjoying the front room with just the table and piano.  I was able to put in a bigger table so we didn't have to squeeze around a six person table anymore.  It looks great in there.  

Now I just have to get the living room done.  I'm planning red and turquoise.  All I have in there so far is my big red couch and two turquoise chairs but I already love it. 


Monday, September 19, 2011

It was a very long summer

First, I spent a week pretending to be a pioneer.  This meant weeks sewing pioneer clothing for myself and my daughter and gathering up a bunch of camping equipment in a household then tends to not go camping.   It was worth it though, one of the most amazing, spiritual experiences of my life.  Totally worth the 26 miles pulling/pushing a handcart with 10 (amazing) teenagers.  I'd do it again in a heart beat.

Next my brother got married.  This meant bridesmaid dress for my oldest daughter and a flower girl dress for my youngest.  My husband had to rent a tux to be best man.  I made the cake and I took the photos.
Isn't he handsome? Best looking guy there.  You will not see pictures of the cake.  It was serviceable, but not brag worthy.

After that my husband's brother got married, so we drove down to Southern California.  Did I mention we live in Idaho?  17 hours by car through the most boring section of the United States.   I did grab that photo on top on the way down though.  It was in one of those little, dying towns that litter the Nevada desert along the highway.  Our air conditioning died about an hour outside of San Diego on the way down.  That was fun.  The wedding was lovely though and we had a good time at the beach.

Then a bunch of other stuff happened and I finally got to send my children back to school.  I gave myself a couple of weeks of rest.   We have now moved on to a complete rehaul of most of the house.  Right now I'm concentrating on my living room.  These chairs go in it:
Yes, that's a red couch in the background.  There will be lots of pictures along the way, but this won't be a fast redecorating project.  I have to do it as funds become available.  I think painting the walls a light turquoise is the next step.  I still am hunting down a rug I like and fabric to coordinate.  However, the photo at the top of this post will be done in a 16x20 canvas for the wall.  I'm excited about the project.  It's all I've been able to talk about for two weeks.

Friday, April 8, 2011

Where I've Been

Making these.   Our Store: Matt28six

You can also find us on Facebook at Matt28six  please "like" us.  I promise we already like you.

Back on New Years Eve my husband and I attended a party at the home of some friends of ours.  There were four couples sitting around the table at about 11 o'clock and somehow we got talking about religious jewelry.  And that discussion turned into a business. 


This is our premier product.  It's a Jerusalem Stone pendant set with sterling silver finding and chain.  The stone is a reminder of the stone rolled away from Christ's tomb.  We call it the Hope Pendant.  Hope for the future.  Hope given to us by Christ.  

Jerusalem stone is a rock that is mined in Israel and Palestine.  It's a dolomite that's between marble and granite in hardness.   Each pendant is so unique.  As we put each piece together I'm always finding a new favorite.  They are surprisingly lightweight and easy to wear.  I love mine so much. 

It's also been very time consuming.   I hope to be able to get back to other projects soon.  I have Easter dresses to sew.    About all I've managed is a home made nylon delta kite.  It's bright orange with gray trim.  It flies great now that I've tweaked it a bit.   No time to write down the instructions though.   Not a problem.  Kite instructions are all over the internet.  Look them up.  Your kids will thank you.  

Monday, March 14, 2011

So I'm Still Around (and I made sugar cookies)

Sorry, I disappeared for a couple of weeks.  We've started homeschooling the oldest and we're starting a business at the same time, so life has gotten a bit crazy.  Like really crazy.  Something had to give and since the blog is not the business and takes quite a bit of time it gave first. 

I won't be posting quite as regularly in the future.  I do hope I can still get in a couple of posts a week, like Monday and Fridays, but I can't guarantee anything.  Please do follow me (button to the right) or put me in your reader or just check back once a week.   I have some fun projects I'm working on and hope to get them up soon.  Like a kite.  yeah.  You may be as tired of green St. Patrick's Day crafts as I am.  March means kites around here.  And I'm making one.  It's been a fun project so far. 

But this weekend's project was piggie cookies:


as you can see, I'm not the greatest cookie decorator in the world.  We did have fun with them.  My youngest decided we needed a piggie party to celebrate our new piggie banks that are actually shaped like pigs.   We made cookies together for our "party."   I used 4 inch rounds for the heads and 2 inch rounds for the noses. The eyes are upside down chocolate chips, the ears are watermelon flavored Starbursts rolled out and cut, and the nose is tropical punch Starbursts shaped into long pointy ovals.   They are frosted with cream cheese frosting so they taste quite a bit better than they look.  

Here's my very, very favorite sugar cookie recipe.  It's tangy, buttery, and it stays soft and chewy.  Perfection.

Cream Cheese Sugar Cookies

1 c sugar
1 c butter
3 oz cream cheese
1/2 tsp almond extract
1/2 tsp vanilla extract
1/2 tsp salt
1 egg yolk
2 1/4 c flour

Combine everything but the flour until well mixed.   Add the flour and mix until just combined.  Divide into thirds and shape into discs.   Wrap each disc in plastic wrap and refrigerate for a couple of hours.   Let rest for 5-10 minutes before rolling out.   Roll out into 1/4 inch thickness, cut, and place on ungreased cookie sheets.  Bake at 375 degrees for 7-10  minutes or until the edges are just light brown.

Remember to bake same sized cookies together, so if you are doing some large and some small cookies you will want to bake them on separate pans.   Small cookies need less time than big ones and keeping them separate means you don't have to compromise on whether to over bake the little ones or under bake the big ones. 

By the way, Happy Pi Day!   If you are looking for a pie recipe to make for your family today you can always try my favorite apple pie.  

Wednesday, March 2, 2011

Chrysanthemum Mirror

 Isn't it cute?   I love the texture and dimension of this new mirror.  It took me about an hour of hands on time to put together if that. 

I started with a 14" circle cut out of thin plywood.  You'll notice that the circle isn't perfect.  In fact, it's kind of badly done, but that doesn't matter because I'm covering the whole thing with rose petals.

I painted it red with basic acrylic paint.  Let that dry, and then traced three circles in graduated size on the wood.   (Luckily for me I had a platter, plate, and salad plate from a dish set that were just perfect for this.  If your dinner ware isn't quite so perfect you can make a compass by tying a string to a pencil.)
 For my rose petals, I bought the box of Wilton brand petals in the "wedding craft" section of my craft store.  These had organdy petals and silks so I was able to add even more texture and interest to my project.

I sorted the petals, pulling out the ones that were the best shape.  Some from the box were flat or were stamped crooked and didn't look great.  Then I glued the petals down to my plywood starting at the outside ring of petals.  The edge of the plywood is completely covered with the rose petals.  The bottoms of the petals did not line up perfectly with the penciled in rings on the plywood, but that didn't matter.  I just used the rings as a reference and eyeballed where the petals should go.   The organdy petals were glued on over a silk petal in random places.
 I continued around the mirror making four rings of rose petals.
 Then I glued down an 8" round mirror.  I used lots and lots of glue.  You can use either the hot glue like I did or a mirror mastic from the hardware store.  If your mirror is small and lightweight the hot glue will hold just fine. I had this custom cut for me at a local glass store.  It took them about 15 minutes to cut it for me and I got exactly what I wanted.  Totally worth it.
 This is a sawtooth picture hanger.   You can buy a package with several in it at the hardware store for a couple of dollars.   I already had these on hand.
 I just hammered the picture hanger into the back of the mirror a couple of inches from the edge.
 Put a picture nail in the wall and hung up my new decorative mirror.   The bright red rose petals look great with my red couch and red accents I have in the room.  I've got a small silk rose topiary on my piano, so the flower theme is already working for me. 
Cost wise, this is a very inexpensive project.  If you have to buy your plywood and paint, it will probably end up costing about $20 to make.  I had the plywood, paint, and picture hanger on hand, the mirror cost me $6, and the rose petals I bought for $7.50 (using a 40% off coupon.)  I have about half of the rose petals left so I could have made a much larger mirror without having to buy another box of the petals.   This size is about as big as I could make with the left over plywood I had.

It was fun to get out the glue gun again.  I'll have to do that more often. 

(by the way, yes I did immediately go back in the living room and straighten my lamp shade just as soon as I got my post up.  Please forgive my lackadaisical home decor.)

Monday, February 28, 2011

Banana Bread

What is it about banana bread?  It's like having a little slice of childhood back with you for five minutes.  We liked to eat it with Kraft Singles when I was a kid.  My husband thinks that's crazy, but then he's the one that won't even put butter on his banana bread, so we don't count his opinion.   These days we usually eat it with just butter because I tend to not buy Kraft Singles these days. 

This recipe is one of those that's been handed down through several generations.  It's worth hanging on to. 

Banana Bread

1/2 c butter
1 c sugar
3 very over ripe bananas, mashed
2 eggs
1 t vanilla
2 c flour
1 t baking soda
1/2 t salt
1/2 c chopped nuts (optional)

Cream the butter and sugar, add the eggs one at a time, scraping the bowl between.   Add the bananas and vanilla, mix until thoroughly combined.   Add the flour, salt and baking soda.   Mix until just combined.  Fold in nuts.  Pour into a greased and floured large loaf pan.    Bake at 325 degrees until fully baked.  It will take over an hour, and maybe as long as an hour and a half, depending on your pan and oven.  Pay attention to the scent coming from your oven, it will tell you when to check the bread.   There will be a crack up the center and that is the last section to fully bake, so when the bread under the crack is done, the loaf is done. 

Friday, February 25, 2011

Little Boy's Tool Belt


I've been doing way too much stuff for my girls lately and my boys were feeling left out.  It's time for a boy project!

I don't know about your boys, but mine like to help their dad with stuff.  Grown up tool belts just don't fit boys.   I was able to just grab stuff I already had on hand to make this belt.  Canvas, upholstery vinyl, and seam tape is all it takes.

1.  Cut your canvas into two rectangles, one measuring 13.25"x15" and one 5.25"x15".   Cut a strip of leather or vinyl 15"x2". 

2. Finish one long end on the big rectangle with some sort of 5/8th inch hem that won't unravel.  I did a simple rolled hem.  Use whatever method works for you.   Fold the other long edge down 5/8th of an inch as well, but do not sew.

3.  Finish one long edge of the small rectangle with a 5/8th inch hem and fold over the other long edge 5/8th of an inch but don't sew, exactly like you did the long edges of the large rectangle. 

4.  Lay the pocket across the big rectangle, placing it right side up on a right side up bottom piece.   The bottom of the pocket should be about 3.5" from the bottom edge.   Sew down.

5.  Finish edge of bag with seam tape.   You can do another method but seam tape gives a nice finished look without extra bulk.

6.  Fold over the top of the bag to the back about 2" creating a casing for the belt to go through.  Sew down close to edge. 

7.  Place vinyl strip across bottom of the bag.  Sew at sides and at different points along the vinyl creating loops for hammers, measuring tapes, and pliers.   (See photo.)

8.  Find an old belt under your son's bed or in the bottom of the closet (if your son's room is anything like my sons' room) and run the belt through the casing.  

The bag is ready to go.  This one is super quick to make and basically free if you've got the canvas or denim in your stash.   It would be easy to use recycled denim for something like this as well.  If you don't have leather or vinyl for the hammer loop strap, you can make a strap with more denim or canvas.  Just make it a double thickness so it's strong enough to support a hammer.   

Wednesday, February 23, 2011

Another peasant skirt

Carnations and roses in pink, red, and green.  This is my middle girl in her new fat quarter skirt.  I was able to change up the pattern a little bit and found some extra inches in length.  She's very happy with it, although she's decided that her big sister and I both need peasant skirts now.   I'm thinking it would take a lot more than 3 fat quarters to fit around my hips.