Monday, November 15, 2010

More Monsters!


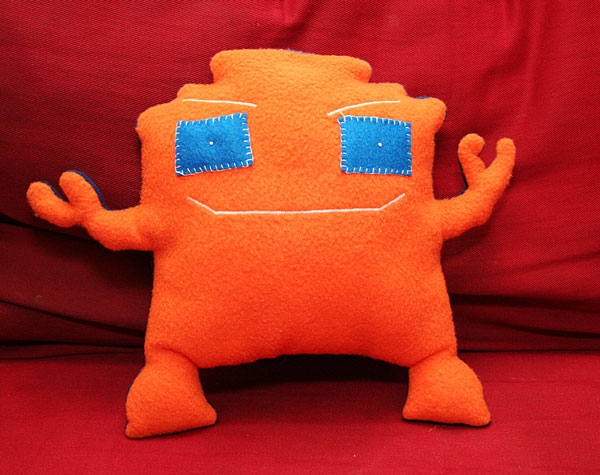
Aren't they cute? I've been having a lot of fun with this project and my kids are as well. They love seeing their monster drawings come to life. I've had to hide the monsters when I finish them because my kids just want to play with them. Not so great when these guys have to go to cousins as Christmas presents.

My oldest designed this one for her 13 year old cousin who's a Boise State fan:
Robot monster also has an evil side:
The blue isn't quite right, but I figure I can get fudge it just a bit.

This is Dizzery, designed by my 8 year old:
The spiral eyes were done using six strand embroidery floss. I tied a knot on the end and pulled the thread up through to the front. Then I carefully laid out the thread in a spiral, a bit at a time, and used a couching stitch to hold the thread in place. I pulled the embroidery thread back down and knotted it when I got to the end. This way there are no loose ends to come undone. It's perfect for toddlers and babies because there are no choking hazards on this monster face.

Another monster, PentaTenta, designed by the 10 year old:

I am in the middle of another monster right now. He's got some face work to finish up (my embroidery needle broke!) and then I can get him sewn together. My youngest is sad because hers is last. Silly girl, she doesn't know I still have 10 more to go after I finish that one!

Friday, November 12, 2010

Better Mashed Potatoes

So the other day as I was making mashed potatoes, I looked in the fridge to grab out the sour cream and happened to notice my buttermilk. The wheels in my brain started turning and into the potatoes went the buttermilk.

They were soooooooo good! I'm not kidding. Best mashed potatoes I've ever made and I make dang good potatoes. I used the buttermilk instead of sour cream or cream or cream cheese, all my standard liquid ingredients. I was also able to use half the butter I normally use, 4 T instead of 8 T. (If you need a recipe, just Google Buttermilk mashed potatoes. I am apparently quite behind on this one and there are at least a dozen recipes out there.)

When you consider the fact that buttermilk has less than 1/4 the calories of sour cream and cream cheese and heavy cream and the fewer calories from the butter, mashed potatoes suddenly aren't so fatty anymore. So there you go. Lower calorie mashed potatoes without losing flavor. Because who actually likes mashed potatoes made with chicken broth? ew.

Buttermilk. Just keep a quart in the fridge from now on. It can sit right next to your quart of heavy cream. (or is it just me that always has a quart of heavy cream on hand?)

Wednesday, November 10, 2010

Monster Doll--Step by Step

My kids love Ugly Dolls. They are pretty cool characters. My kids also love to draw monsters of their own. For Christmas we have to have presents for 10 nieces and nephews. I thought it would be fun to make monster dolls in the style of Ugly Dolls for their cousins that my kids designed.

Here's my first:
This monster was designed by my oldest son for his cousin who loves purple. He was super simple to make. Here's how I did it.

First you need to get your kids to draw you some monsters. Have them draw lots of them so you have some to choose from. Some monsters are easier to copy than others, of course, and you want to start with something simple. I started with that red ink monster in the top left. You will also need pattern tracing fabric, which is available at most fabric stores. I use a product made Pellon that I buy at JoAnn for $1.99/yd. I love the stuff and buy 4-5 yards at a time. JoAnn keeps it with the interfacing, so check there. I also found my flexible ruler to be a huge help. That I got at Staples in the drafting section and I love it. It's very useful for a lot of projects. It's the blue and white tool in the top center. And of course I used scissors and a good pencil (gotta love my Dixons.)

Mark your pattern fabric at the outer edges of the size you want the monster to be. My monster is 14" tall by 14" wide at the outermost points, so I made four small marks at each end. These reference points helped me keep my drawing sized correctly. Next, mark the center point of your fabric, also as a reference point.
This particular monster is symmetrical, so I started creating the pattern by drawing one side of the monster's body. The original monster your child drew may have to be modified. It will be very difficult to stuff narrow sections smaller than 1/2" wide. Keep your sewing skills in mind, but try and stay close to the original.
Curves and circles can sometimes be harder to draw smoothly. I rest the heel of my hand on the paper and sketch the curve like my hand is a compass. You can also use the flex curve to create the curves you need and trace the edge.

Next, mountain fold the paper in half along the center marking. Trace your pencil lines onto the other side of the paper.


A closer look:

If you did a mountain fold, you should have a complete monster when you open the paper back up again. Now you get to do the face. The face my son drew was very easy for me to replicate. I love the straight mouth! Now that I can sew.

Now you need to add your seam allowance to the whole pattern. I used a seam gauge like this one. Notice it has a little hole near the end. I set my gauge 1/4" from that hole and put the pencil in the hole. Then I could just follow the edge of the pattern and draw the new cut line in one super easy step.

The arms on this particular pattern were close together. I just got as close as I could with the seam allowance and marked the sewing lines on the fabric. I could sew the arms and then trim them apart later.
Next I marked the fabric for the face. This style of marking may not be familiar to you. My mom called it "tailor tacking." I have no idea where she got it from, but it's quick, easy, and it uses up all my bobbin thread from past projects. It has it's limitations, but works just fine for this. Basically, I mark my spot with one single stitch leaving the thread long at each end. The eye, by the way, was made by tracing a spool.


Next I needed to sew on the face. This is embroidery and applique work, so you need to use a stabilizer behind the fabric. I remembered this after the fabric went all funky trying to sew the mouth. oops. The mouth is a very tight, small zig zag sewn in a straight line. The eye is hand sewn with a button hole stitch and a big fat French knot in the center. Teeth are sewn just like the eye. If you have a machine with an adjustable button hole stitch on it, you could machine sew it. My sewing machine isn't that cool. Basically, sew down what you need to sew down or zig zag where you need to zig zag. You do not need an embroidery machine to make one of these monsters. Ok, now we get to start sewing. Put right sides together and sew all the way around the monster.
You can see there where I marked the arms so I could get the seaming correct.
Well, all the way around except for a 4" opening along one edge. Make sure this is big enough you can fit your hand inside. You'll need to be able to reach in the monster to stuff it.

Then you get to do my least favorite part: clipping the seam allowance. Clip your curves to reduce fabric with those inverted triangles. Clip inside corners as well. You can also see where I cut the arms apart.
Turn the monster right side out and start stuffing. Make sure you get in the little places well like horns, arms, feet, tails, etc. I find a dull or un-sharpened pencil works well to help get the stuffing in place in tight spaces. Stuff you monster well because he will be getting lots of love.

Sew up the opening and your monster is ready to play with.

I'll be posting more monsters as I get them done. Good luck with yours. :)

ETA:Just to give you an idea of the variety you can make with these guys: Here's a few more monsters I've made lately. And another set of monsters.

Thursday, November 4, 2010

Bookshelves

So I don't always work in fabric. Recently my husband and I built a set of bookshelves for the play room. I love them! We went with floor to ceiling built ins with fixed shelves. We wanted height and easy build.

Since I wanted the shelves to be strong, we choose to not build them in place (I wanted the nails straight with no toe nailing and the back of the shelf nailed in place as well.) That meant keeping the unit shorter than the actual ceiling height so we could tip it into place when we brought it in the room to install it. The lovely moulding on the bottom is actually covering a 2x4 box my husband built to support the piece. So we built a complete bookshelf 3 and a half inches shorter than we wanted it to be and then tipped it up and set it on the box. It worked perfectly.

The shelves are nailed on three sides for stability and edged with 1"x2" for strength and looks. The whole thing was built with plywood and 1x2.

As you can see, the big shelf holds the kids' books. We've been collecting for awhile and it's such a relief to finally get a unit that holds everything!

Opposite the big shelf is another weird jog in the wall, so it got a little matching bookshelf for my books. It is not nearly big enough:
But I still like it. Same construction techniques.

And here's a close up of our pretty, pretty moulding:

We have a lumber yard near our house that specializes in seconds and over stocks so we got that beautiful 4" base for $6 a stick. Not a foot. $6 for the whole piece. We picked up crown for the basement at the same time and it cost us $20. Yeah, I can deal with a little bit of blade chatter for that price.

Sorry it's been awhile since I posted something. Getting my last post picked up by a big craft blog was really intimidating.

On tap for the next few weeks: Christmas presents. I have five nieces and nephews to craft for. I've got to figure out something a 13 year old boy who only plays video games would like to have. Wish me luck! (three of them are getting my version of the Ugly Doll.)

Wednesday, October 27, 2010

Yet Another Purse

Yes, I know. I do a lot of them. If it helps, this one wasn't for me. I donated it to our local library's silent auction. Sadly, it only went for $12, which is way under what I would sell it for if I were inclined to sell purses, but it was very well loved.

I made it specifically to tempt one of the librarians who loves my handmade purses and has been wanting me to make her one for over a year. She also loves feminine things including ruffles. So I did ruffles with a vengeance.
Yup. Five. I wanted double gathering so the width of the bag is 1/4 the width of the fabric I was working with minus the seam allowance. That's 11 inches because I was working with 45" wide quilting cotton. I made a rectangle 11" wide by 8" high. (my bags have to be rectangles. I don't like square bags. they don't look right.) Then I grabbed a plate out of my dish drawer to scribe the curves. I kept the plate edge 1/2 in from the edge of the bag to allow room to sew the handle into the bag later. (See photo below) Then I added the seam allowance to the entire pattern.

The ruffles are 45" long x 2.5" wide. I sewed them in a loop and hemmed each side, serging before the hem to avoid the nastiness that is a handkerchief hem. I determined that the ruffles should be 1.25" apart and marked those lines onto the pattern fabric so I could transfer the placement lines to the fabric. It made it a lot easier to sew on the ruffles. I divided the loop into quarters and marked those points with pins before gathering to make it easier to get an even gather all the way around the purse. (Fold in half. Mark the ends with pins. unfold, match the pins in the center and mark your ends with pins again.) I sewed the outside together before I placed the ruffles. It made it more difficult, but gave me a fuller ruffle.  You can use this couching method to sew your gathering stitch.  It's very easy and makes gathering this much fabric quick and easy.

the inside pockets are two rectangles of the second contrast fabric cut 11x6.5" and hemmed on one end. Just decide how you want your pockets to be divided and mark and sew those lines. I always do at least two skinny pen pockets because I hate digging around in my purse for a pen. Be sure when you sew the pockets down you reinforce the top edge well. I always do the first 1/4" in a very tight zigzag then switch to a straight stitch for the rest.


The oval bottom is the hardest part. I used an architects' flexible curve ruler and drew out one quarter of an oval 5.25" long. I just eyeballed the curve to be sure I liked the shape. Then I folded the fabric and traced out the rest of the oval, adjusting as needed with my ruler to be sure the circumference stayed 22". Then I traced out a second line out from the first to create my seam allowance. I was really proud of my oval because it worked perfectly without easing and without adjustments. :)

The strap pieces were cut 24"x1.5" and sewing down each side with 0.25" seam allowances. Don't sew the ends. I always pull an interfacing that's the width of the finished strap through the strap after I've turned it because it gets rid of the bulk of a heavy interfacing in the seams.

This bag was lined with canvas for stability and strength.

I know reading directions can be confusing without pictures or video. I'll see what I can do about putting together a pattern making tutorial as soon as I can. (No promises on time line. I'm pretty busy for the next couple of months.)

ETA:  A step by step tutorial with pictures on how to make a very similar ruffle bag out of three fat quarters is here.  

Friday, October 8, 2010

Miche bag cover!


I'm so excited! I finally took the time to get a pattern worked out for my Miche purse. Isn't it cute? This is design number two actually. The first is flat wrap around cover. If you are familiar with Miche bags, you know the type I'm talking about. I liked it ok, but I'm much happier with the end covered style of cover.

There are still a few tiny issues to work out. One being the interfacing/reinforcement issue. Miche uses some kind of very stiff cardboard, so you can't wash their covers at all. I found this out the hard way and now have a corduroy cover that has to be repaired. Very sad. I loved that cover. I used needlepoint plastic canvas in this one and it's not bad. It's still not quite what I need; it's a little floppy for this use. It has to be very stiff to hold the cover tightly against the purse.

The flowers are hand sewn simple gathered fabric flowers. Just the finishing touch it needed. I bought the fabric because I loved it and didn't think about clothes it would match. I went through my closet last night and discovered three shirts that weren't plain white that do match and I have a shirt that's been in my to be finished pile for over year that's the perfect color of yellow. What a great discovery.

Next up is new black handles. It would be best if I had a black base for this cover, but I don't, so I'm going to buy some fake leather at Jo-Ann to make a new set. They will be a proper length unlike the set I have now. I may leave this cover on a lot just because I like the handles better.

Sunday, August 22, 2010

Old Dress Makeover

One of Sarah's friends gave her several old dresses. The dresses had been sitting in the back of someone's closet for decades and the owner was looking for a new home for them. This particular dress was the best of the bunch.

We loved the skirt. Who could not love that skirt? So sweet and swooshy. Sarah also adored the cummerbund, I wasn't sold on it but was willing to salvage it if possible.

Our plan was to cut off that monstrosity of a bodice (check out that collar!) and turn the dress into a skirt. It's a bit shorter than she likes to wear her skirts as is, so we planned to drop it a couple of inches. I had also planned to take apart the cummerbund and use another pattern to sew a shaped waistband/yoke from the fabric.

Luck was with me, though. The cummerbund had an interesting construction detail that saved me an hour and a half of work (and countless mental swear words. I may not say them, but I do think them when pushed.) At the ends of the band the fabric had been folded in an inch and a half rather than sewn to the exact length. That three inches made it possible for me to just take the band and use it directly as the new waistband. I did have to take in the top edge about an inch and a half or so to adjust for her waist. I did that the same way they did, just folded it in.

This of course meant that I was able to salvage that front knot on the cummerbund; it was Sarah's favorite part of the band. It's the perfect detail.

Here's the finished skirt:

All together it took me about 45 minutes to take this dress from strange and out of date to gorgeous one of a kind skirt.

Sarah is very happy. She's also not all that sad that none of her blouses quite work with it so she needs a new one. We're thinking something fitted in cream.